 Fellow Canadians: All inFlow plans are available in Canadian dollars



 Home
Home


How to track lot numbers & expiry dates in inFlow
Lot number tracking, also known as batch tracking, provides end-to-end traceability for your products. Assign a lot number when you receive or manufacture products, and inFlow follows that lot through every order until it’s sold, so you always know where a batch came from and where it went.
Please note: Lot tracking is only available on select plans or add-ons.

This video was recorded during the beta phase of lot tracking, so some features might have changed since then. Please follow the steps in this article for the most current instructions.
If you’ve been tracking lot numbers with sublocations, see transitioning to inFlow’s lot-tracked products.
What are lot numbers?
Lot numbers (also called a batch number) are a unique identifier you assign to a batch of products made or received together. Every product in that batch is treated the same, so the lot number ties them together from the moment you receive them to the moment they’re sold.
Lot numbers matter most when you need to trace a batch after the fact. If a batch has a problem, you can follow its lot number to see exactly which orders and customers it reached, making a recall quick and targeted rather than a guessing game. Pairing lot numbers with expiry dates also helps you sell or use your oldest stock first and clear out anything past its date.
Lot tracking is common in industries where traceability is required or expected, such as:
- Food and beverage, where expiry and best-before dates and recalls are part of daily operations.
- Pharmaceuticals and supplements, where regulations like those from the U.S. Food and Drug Administration (FDA) call for batch-level traceability.
- Cosmetics and personal care, where products carry batch codes and expiry dates.
- Manufacturing, where tracing a batch of raw materials through to finished goods helps isolate and contain quality issues.
How to create a lot-tracked product
- From the Main Menu, hover over the Create button (plus icon), then select Products.
- Fill in the Product name field.
- Stocked product is the default product type. Turn on Enable lot tracking and, if needed, Include expiry dates.
- Click Create.
A product’s type is permanent once saved. Turn on lot tracking before you receive stock for the product.
Manage lot number details
After creating the product, you can set up how inFlow generates and handles lot numbers for it.
Set your lot number format
- From the product record, click Manage lot numbers.
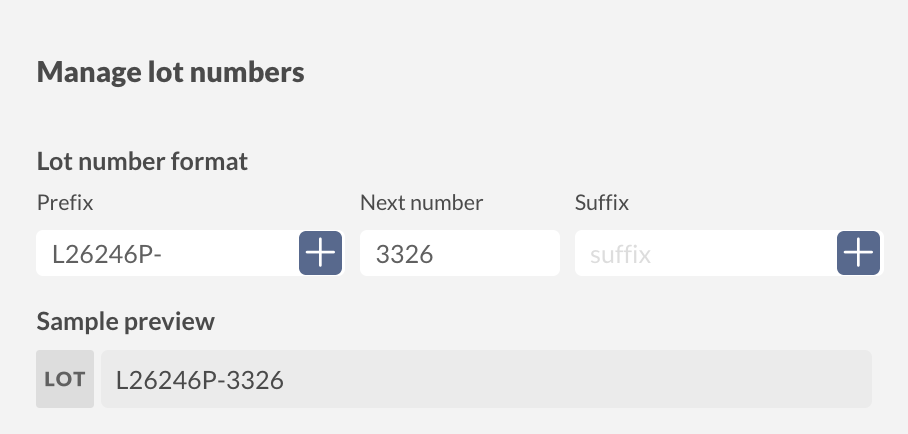
- In the Lot number format section, set your Prefix, Next number, and Suffix if your team follows a standardized lot number style. The Sample preview shows what the next lot number will look like.
- Optionally, click the plus icons to add variables to the Prefix or Suffix fields. These placeholders automatically fill in order details, such as the transaction number, transaction date, or expiry date, whenever inFlow generates a lot number.
Set shelf life, near expiry, and sell-by date
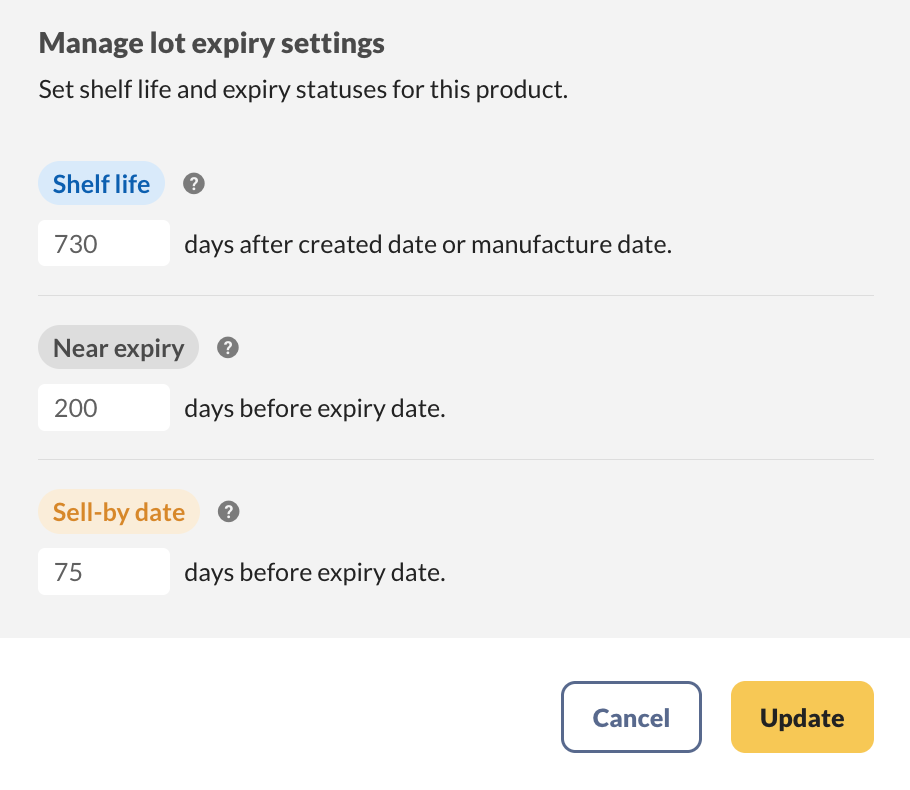
For lot-tracked products with expiry tracking, set the shelf life and expiry setting.
- Set the Shelf life in days based on either the created date or the manufacture date. inFlow uses this shelf life to calculate the expiration date for new lots when received.
- Set a Near expiry period in days before the expiry date to flag lots before they expire. inFlow calculates the near expiry date from the lot’s expiry date, so if you change the expiry date, the near expiry date updates automatically.
- Set a Sell-by date in days before the expiry date. inFlow calculates each new lot’s sell-by date based on this setting, and you can still override it for an individual lot.
- Click Update when done.
A few things to know about how inFlow applies these settings:
- Changing the Sell-by date setting only affects new incoming lots, not lots already in your inventory.
- inFlow will not suggest lots that are past their sell-by date during picking, even if they have not expired yet. You can override this suggestion by selecting them from the bottom of the lot selection list.
- If a lot-tracked product doesn’t have a default shelf life, inFlow sets the receive date as the expiry date when you receive the product.
How to view lot quantities on the product record
The quantity section of the product record breaks down your stock by lot number, so you can see how much of each lot you have at every location.
- Open the product record.
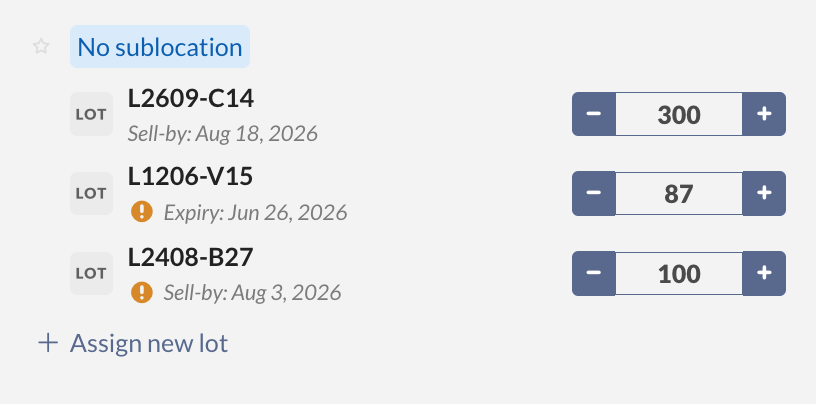
- In the quantity section, click a location to expand it and view the lots stored there. Lots are grouped by sublocation, or under No sublocation if you don’t use them.
- Each lot row shows the lot number with its sell-by date, or its expiry date if the lot doesn’t have a sell-by date. A warning icon appears next to lots that are expiring or expired.
- Use the − and + buttons next to a lot to adjust its quantity, or click Assign new lot to add another lot at that location.

How to add custom fields to your lots
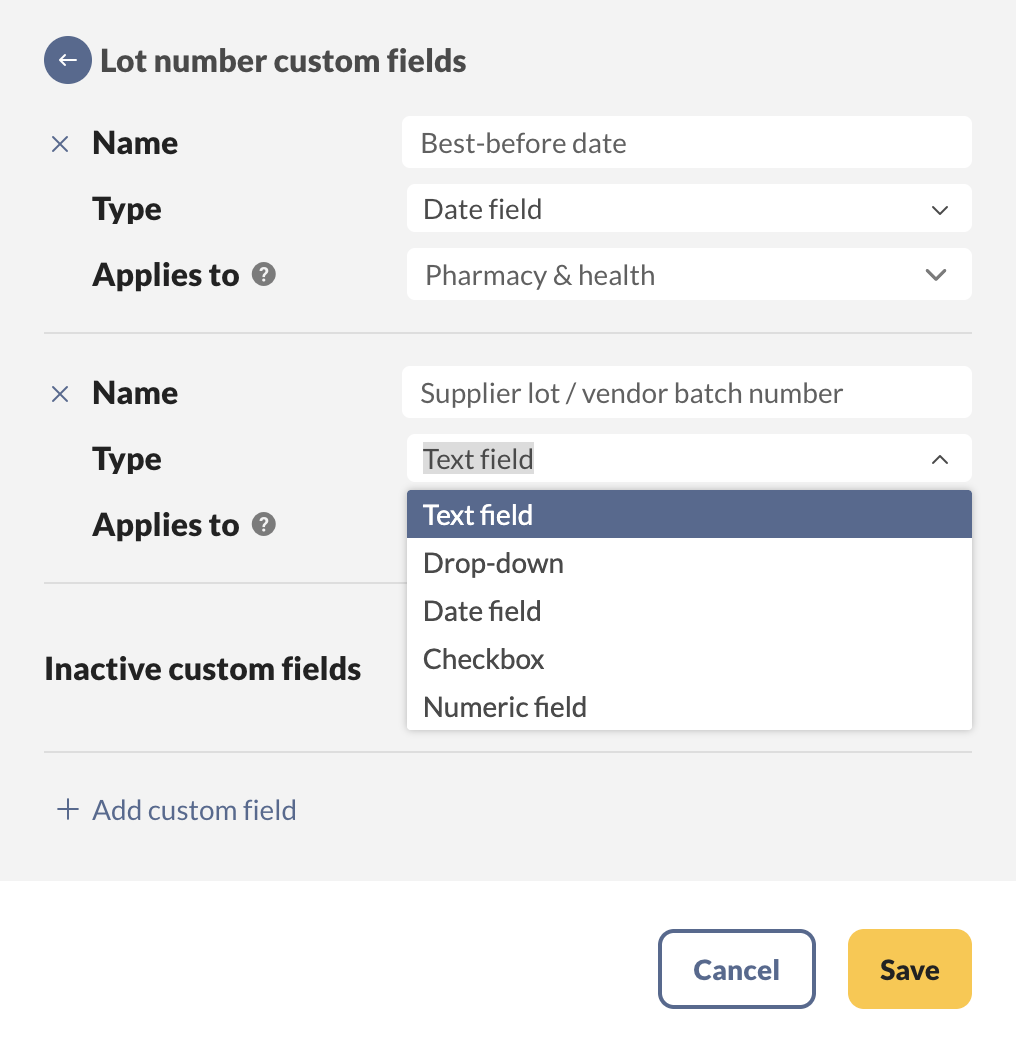
Lot custom fields allow you to track additional details for each lot, such as the manufacturing date, warranty date, or size. Unlike other custom fields, lot custom fields can be linked to specific product categories, ensuring they apply only to lots of products within those categories.
You can manage lot custom fields in the Lot Number Custom Fields window, which can be accessed from the Lot details in the product record.
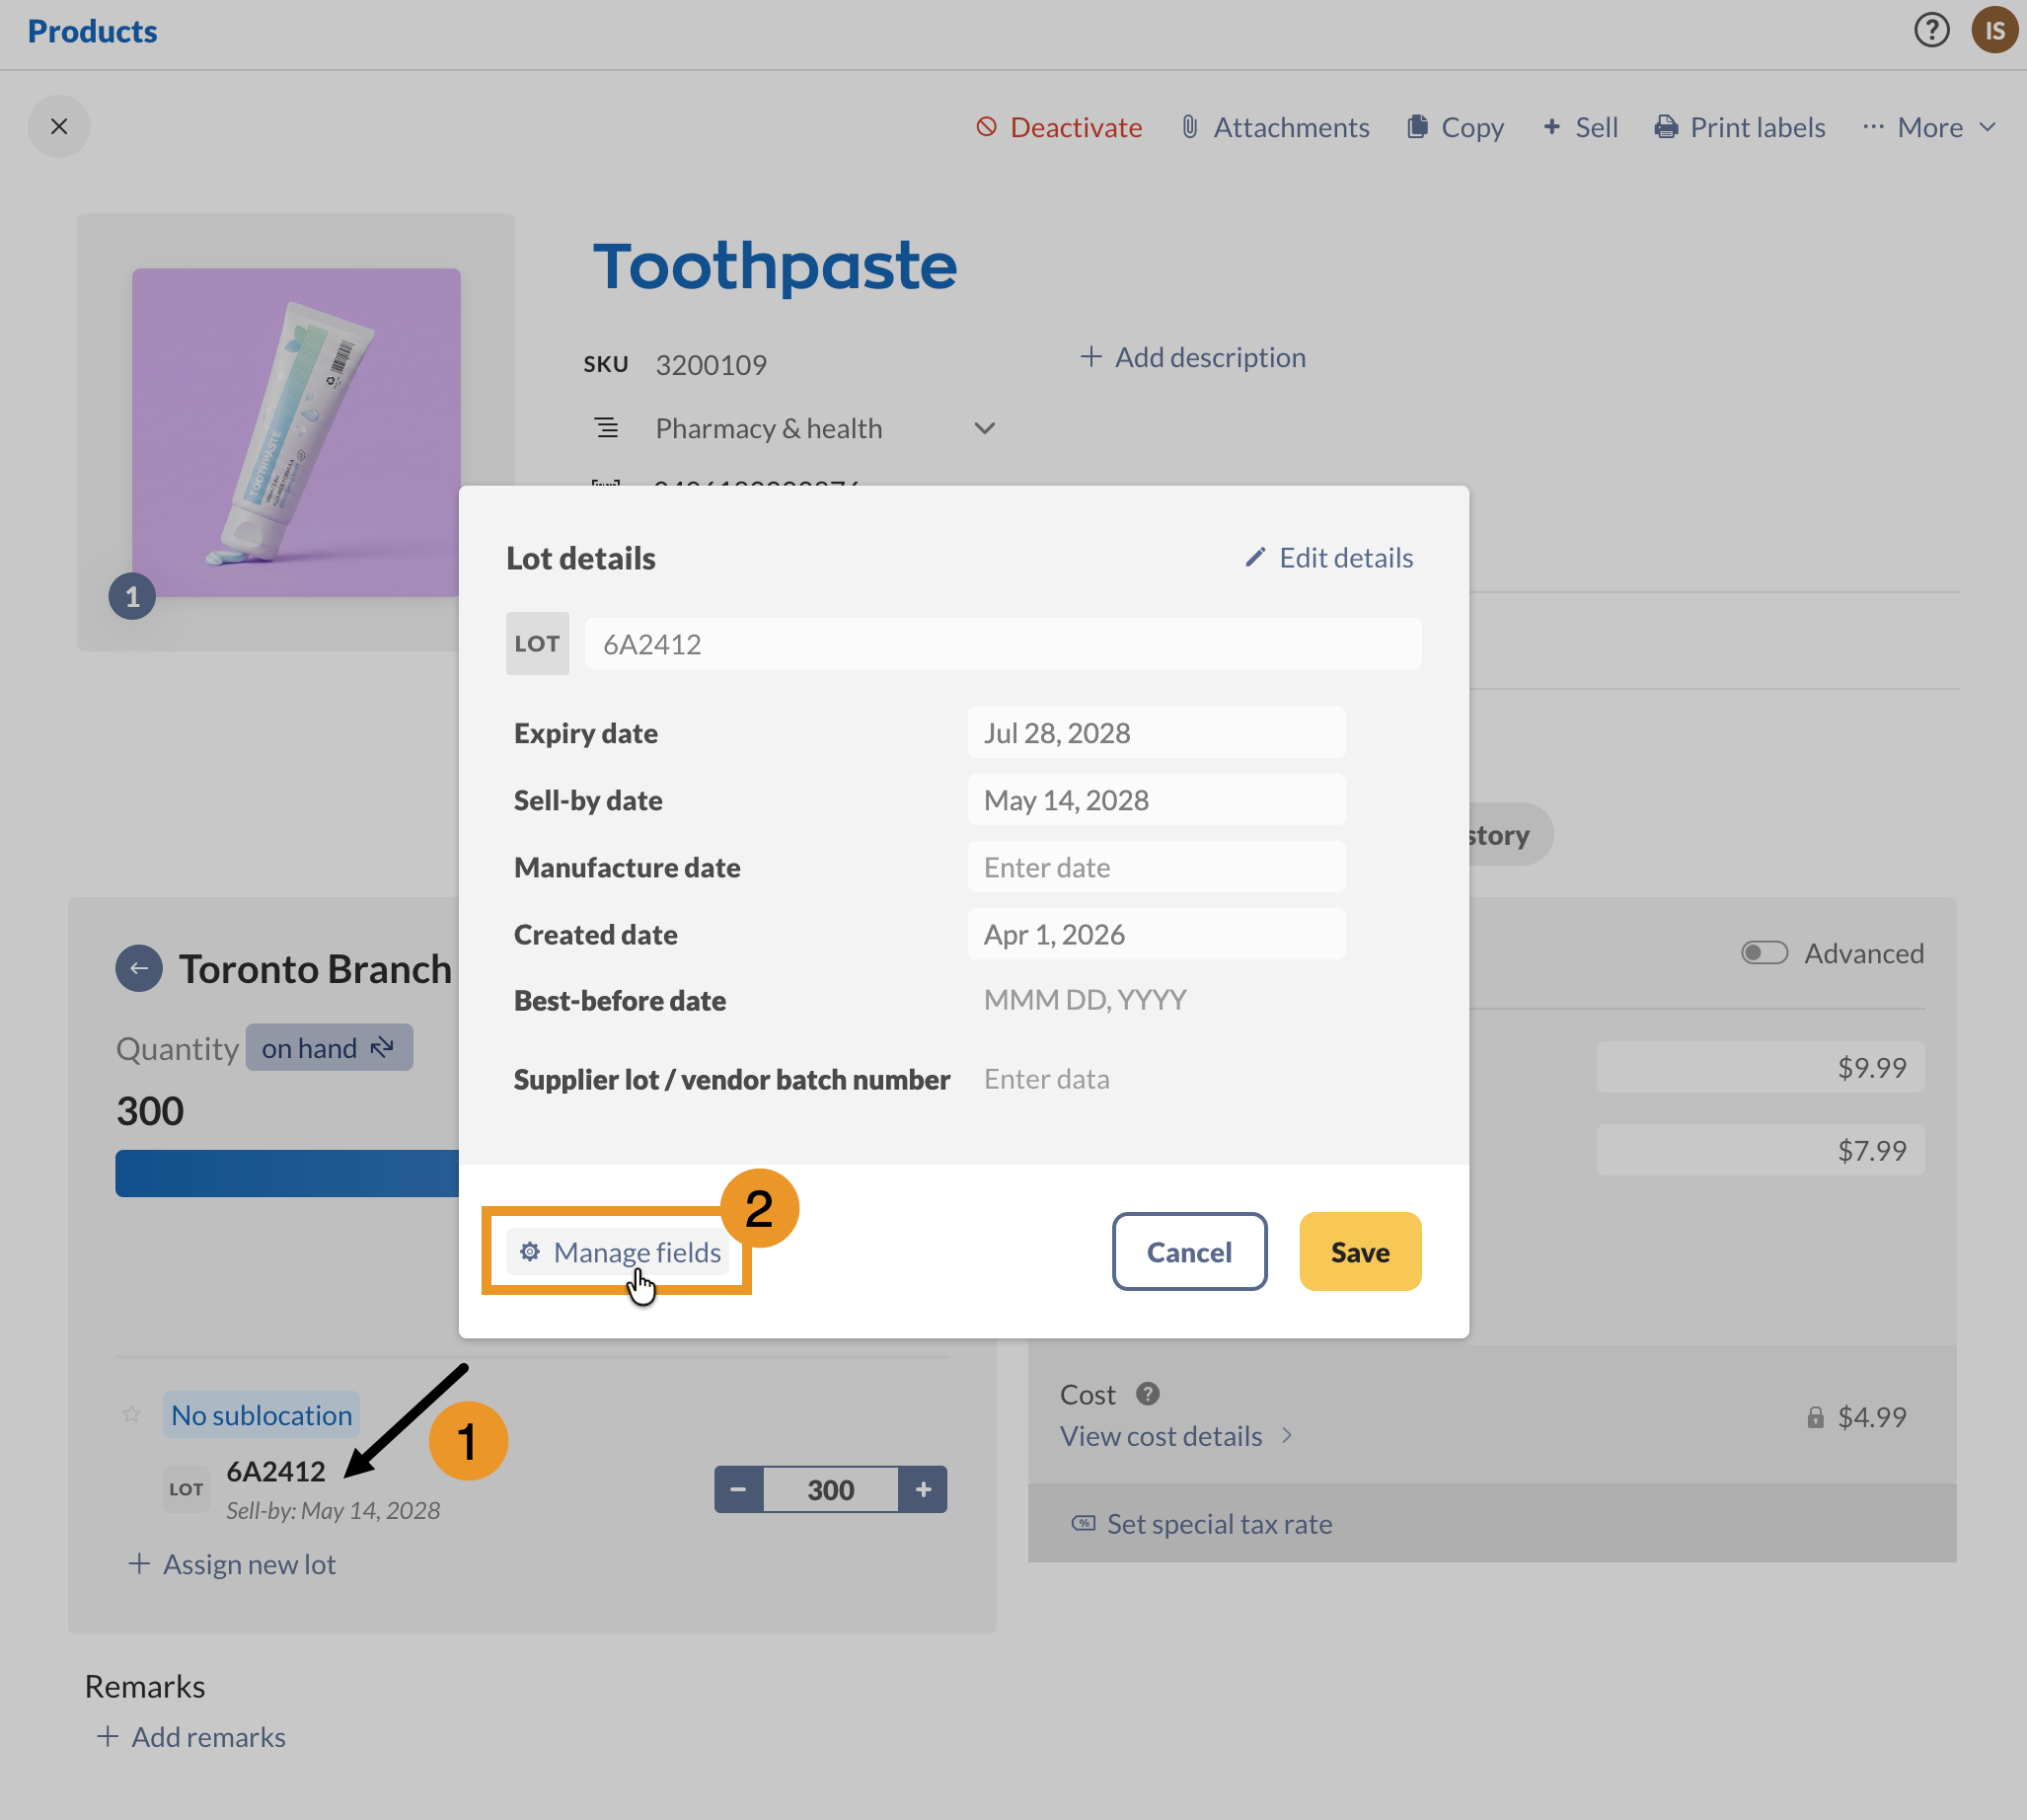
- On the product record, click a lot in the quantity tile to open its Lot details.
- Click Manage fields to open the Lot number custom fields window.
- Click Add custom field.
- In the Name box, type a name for the field.
- Choose a Type: text field, drop-down, date field, checkbox, or numeric field.
- Use the Applies to drop-down to choose a category to apply this lot custom field to. Otherwise, leave it set to All categories.
- Click Save.
Lot custom fields are sorted alphabetically by name wherever they appear, so name your fields with the order you want in mind.
Once you’ve set up your lot custom fields, you can fill them in from the Lot details screen when you receive or adjust a lot.
Removing lot custom fields
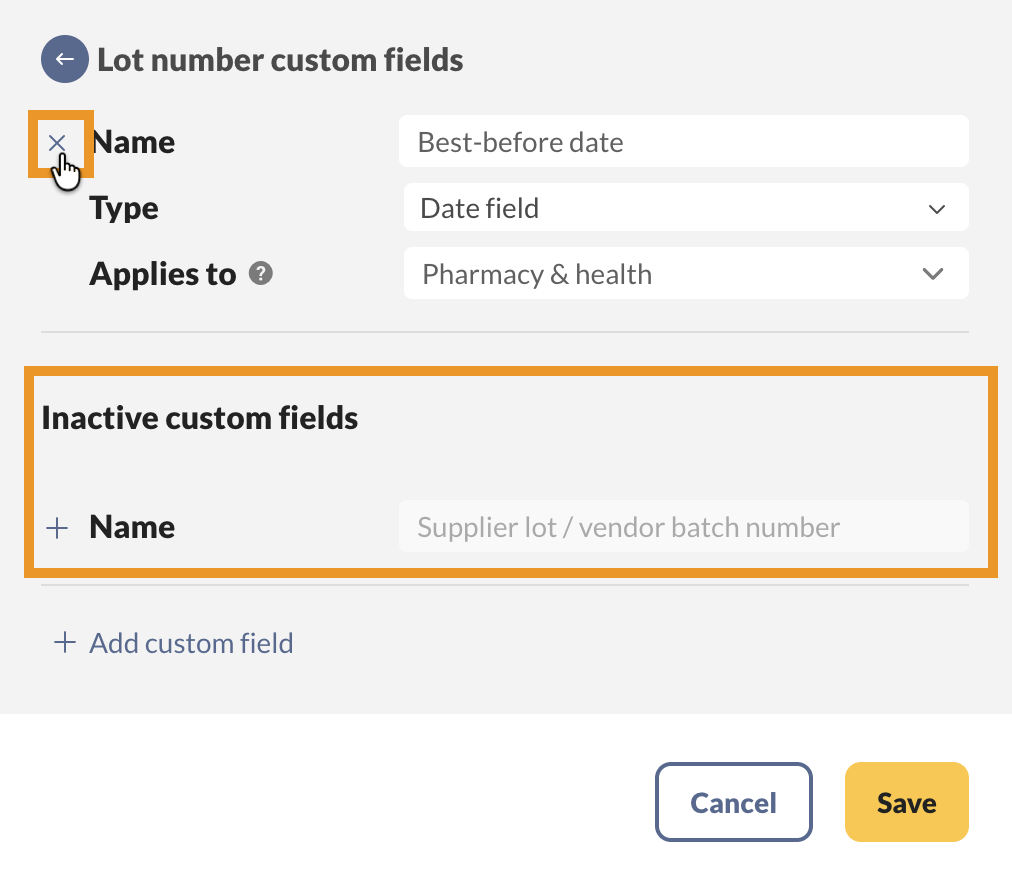
To remove a field, select the Lot details to open the Lot number custom fields window, click the X next to the field’s name, then click Save.
Inactive lot custom fields move to an Inactive custom fields section, so your data stays intact without cluttering the list.
Expiring stock
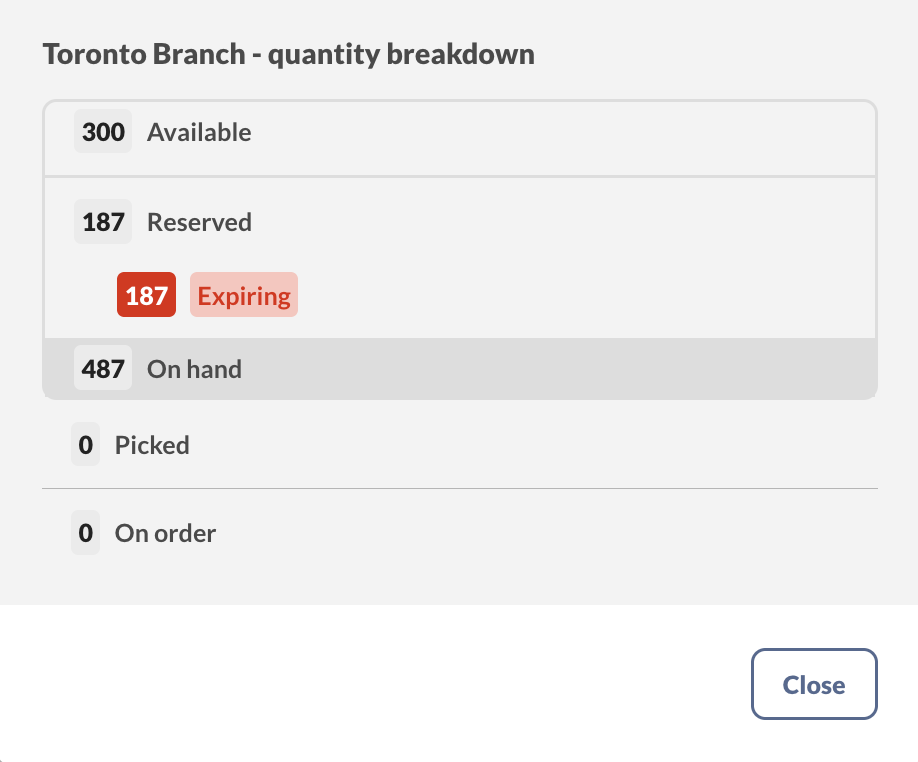
The Expiring number in the quantity section shows how much stock has passed its expiration or sell-by date. Use it as a quick signal to write off or discount that stock. For how inFlow counts quantities, see the quantity breakdown guide.
How to get notified before products expire
inFlow can email you about lots that are near expiry, past their sell-by date, or expired, so nothing sits on your shelves unnoticed.
Setting up lot email notifications
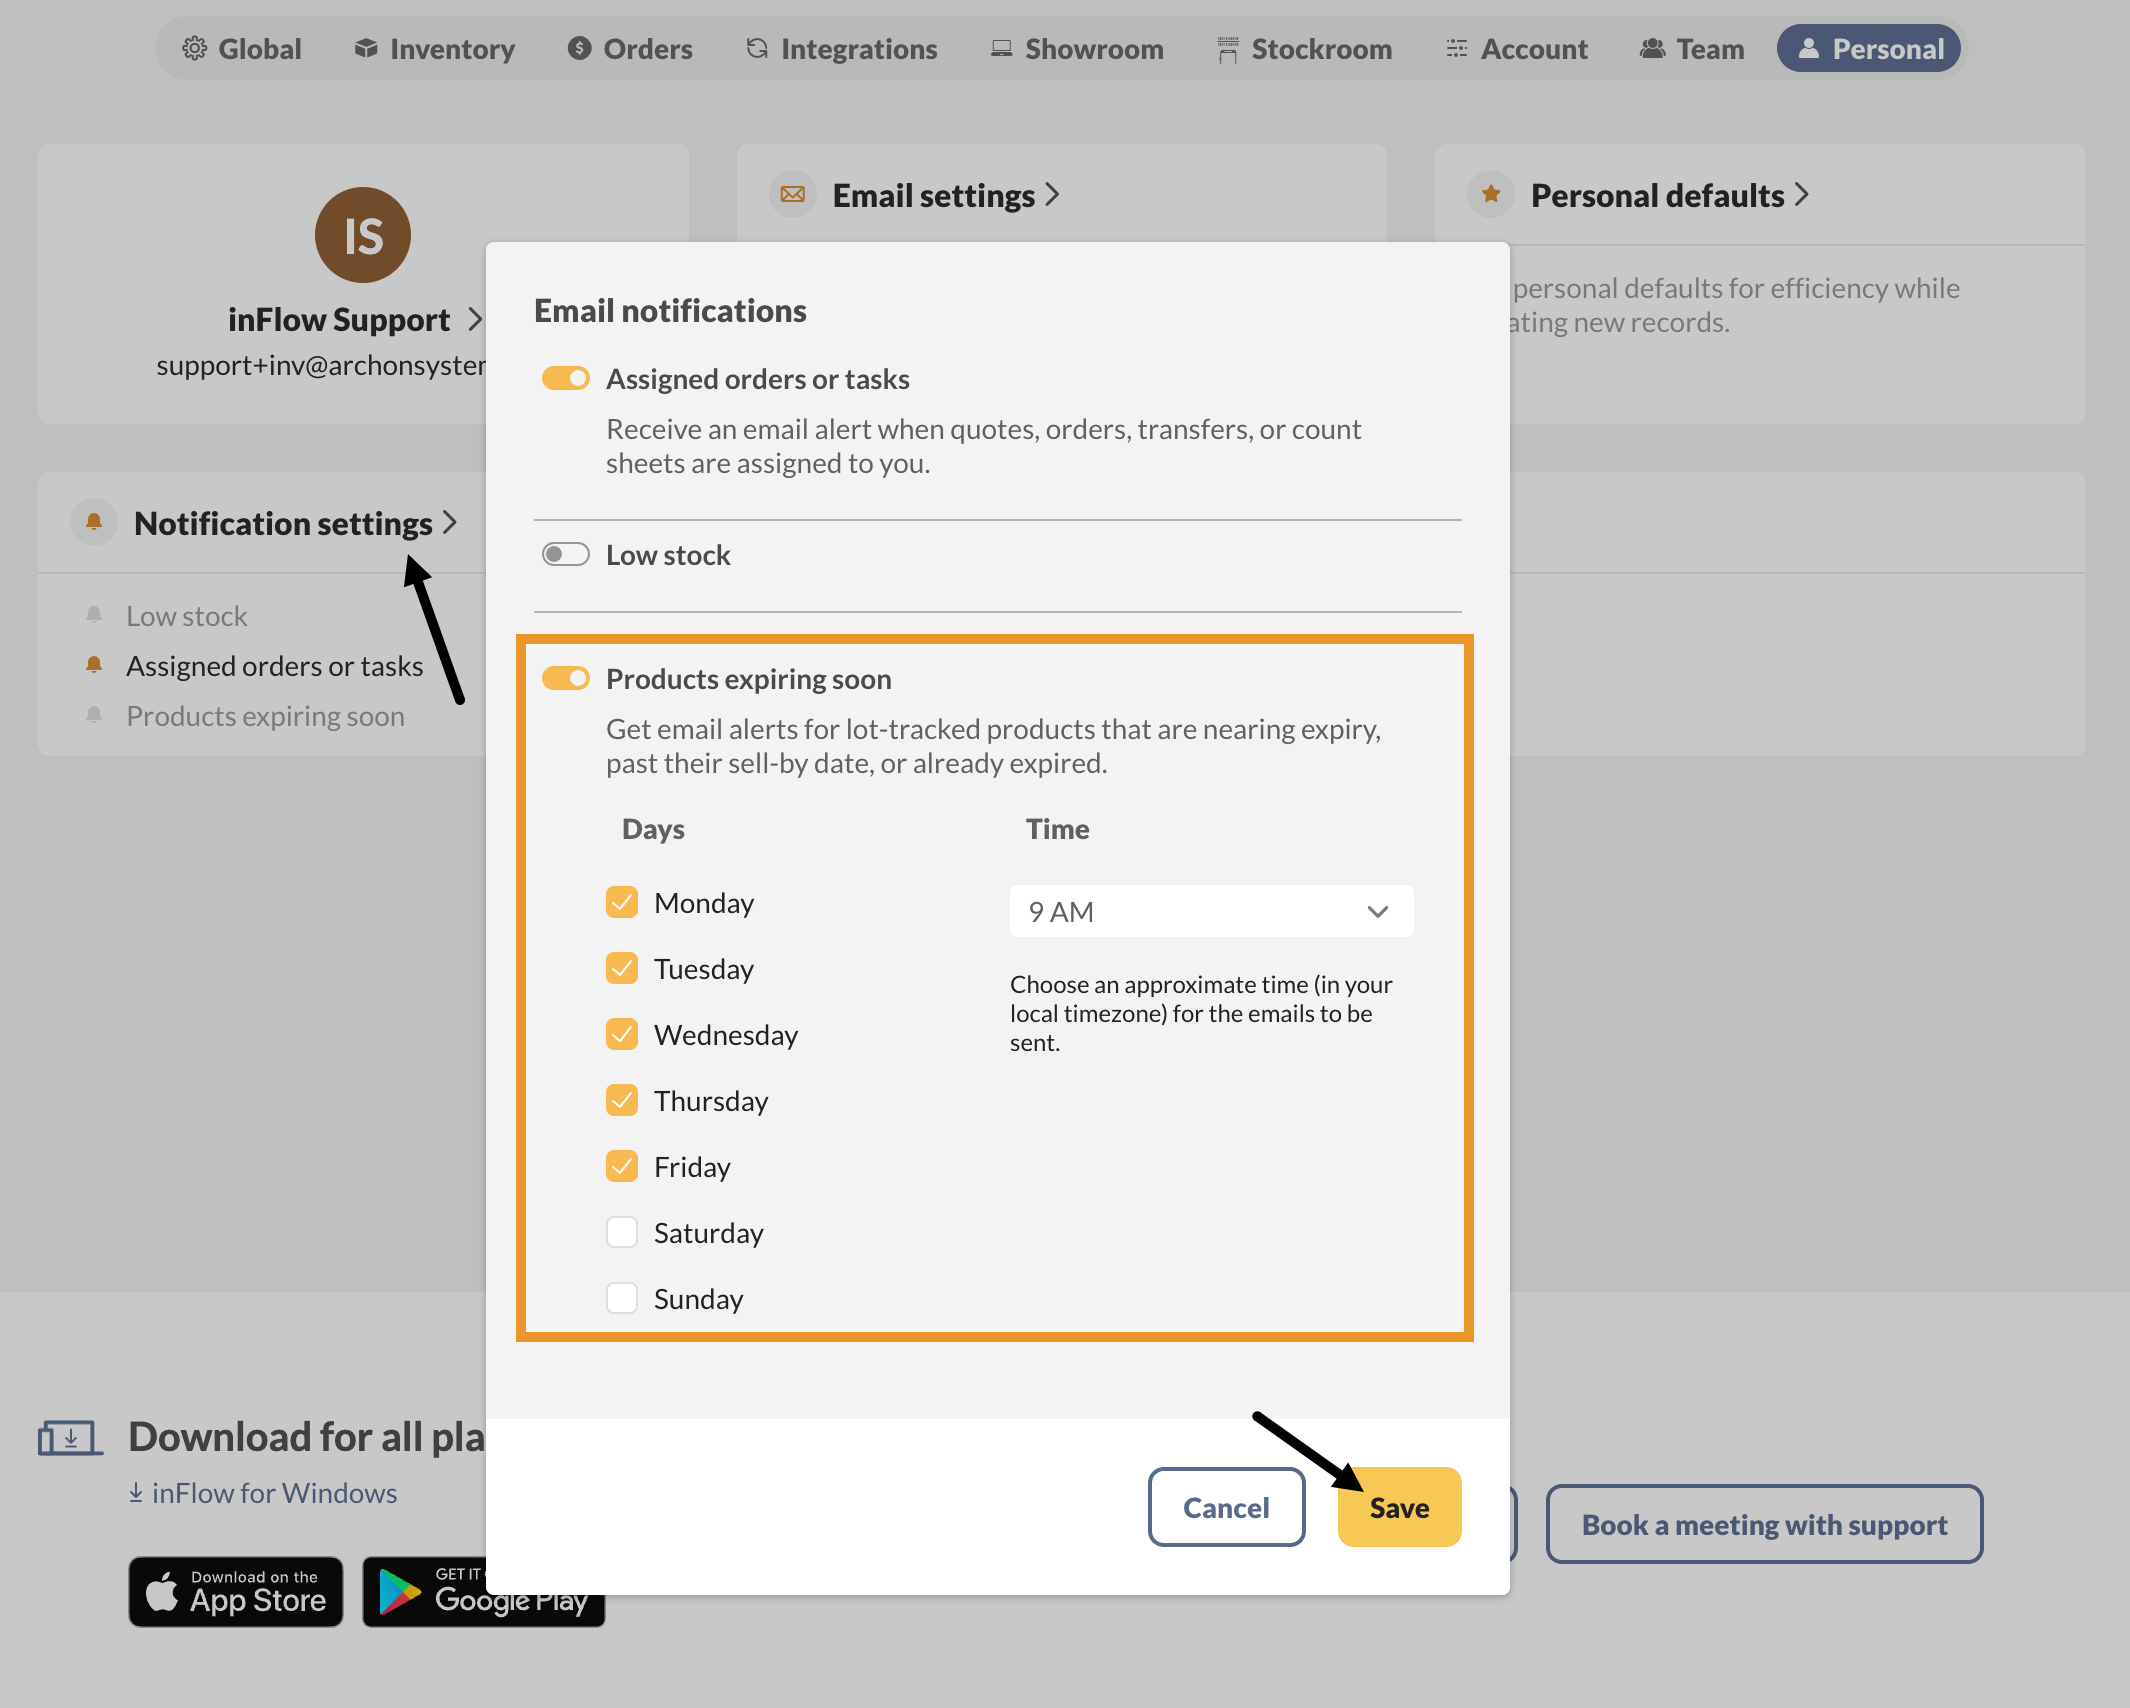
- Open the inFlow Personal settings. (Click your initials in the top-right corner, then select Personal Settings).
- Click Notification settings.
- In the Email notifications window, turn on Products expiring soon.
- Choose which days you want the email sent and what time it should arrive.
- Click Save.
Lot email notifications
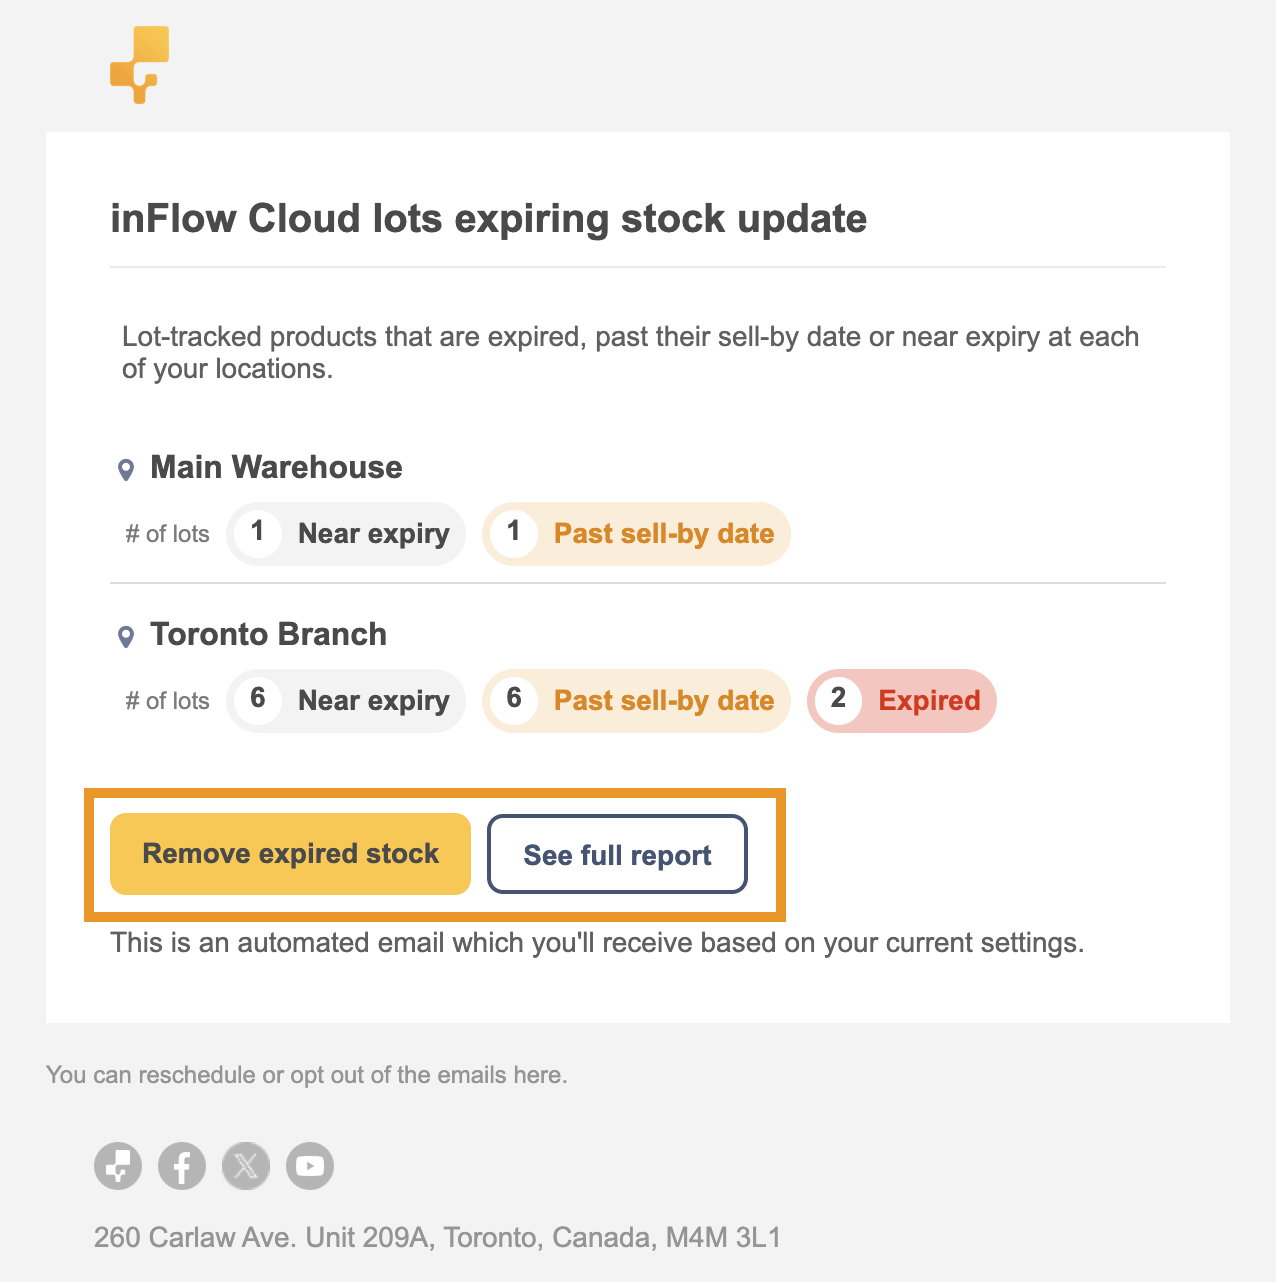
The lot expiry email groups your lots by location and shows the number of lots that are near expiry, past their sell-by date, or expired at each one.
From the email, you can click Remove expired stock to open the Write-off stock window, or See full report to open the Lot expiry report.
You can also reschedule or opt out of the emails from a link at the bottom.
How to write off expired lots (stock adjustments)
When a lot expires, you can remove it from your inventory with a stock adjustment. inFlow has a shortcut that gathers the expired lots for you, so you don’t have to find them one by one.
- From the Main Menu, hover over the Inventory icon
 , then select Stock adjustments.
 - Click Write-off expired stock at the top right of the screen.
- In the Write-off stock window, select the Location you’re writing off from.
- Choose which stock to remove: Expired, Past sell-by date, or Near expiry.
- Click Continue. inFlow builds a stock adjustment containing the lots that match.
- Review the products and their quantities. The stock adjustment order status will be automatically marked as completed.
- Close the stock adjustment when done.
How to track lot movement history on a product record
Select the Movement history tab on the product record to follow a lot from receiving to sale.
Track the movement of your lot products
If you ever need to track the movement of a batch, you can find all the orders connected to a lot number from the Movement history tab.
- On the Movement history tab, filter by the lot number you’re tracing.
- Export the results to CSV to get a list of the sales orders, customers, and dates connected to that lot.
How to view lots on the Current stock screen
The Current stock screen displays the lot and serial numbers for all of your tracked products in one place.
- Open the Current stock screen (from the Main Menu, hover over the Inventory icon , then select Current stock).
- Turn on the Show lots toggle at the top right. This adds a Lot & expiry column so you can see each product’s lots and expiry dates.
- Use the search or filters to find a specific lot number.
To print labels for your lots, click Print labels on the Current stock screen, then select the products. See label printing within inFlow for more.
Receiving lot products on purchase orders
Purchase orders (POs) let you assign lot numbers and expiry dates as you receive products from your vendors.
Receive lot products
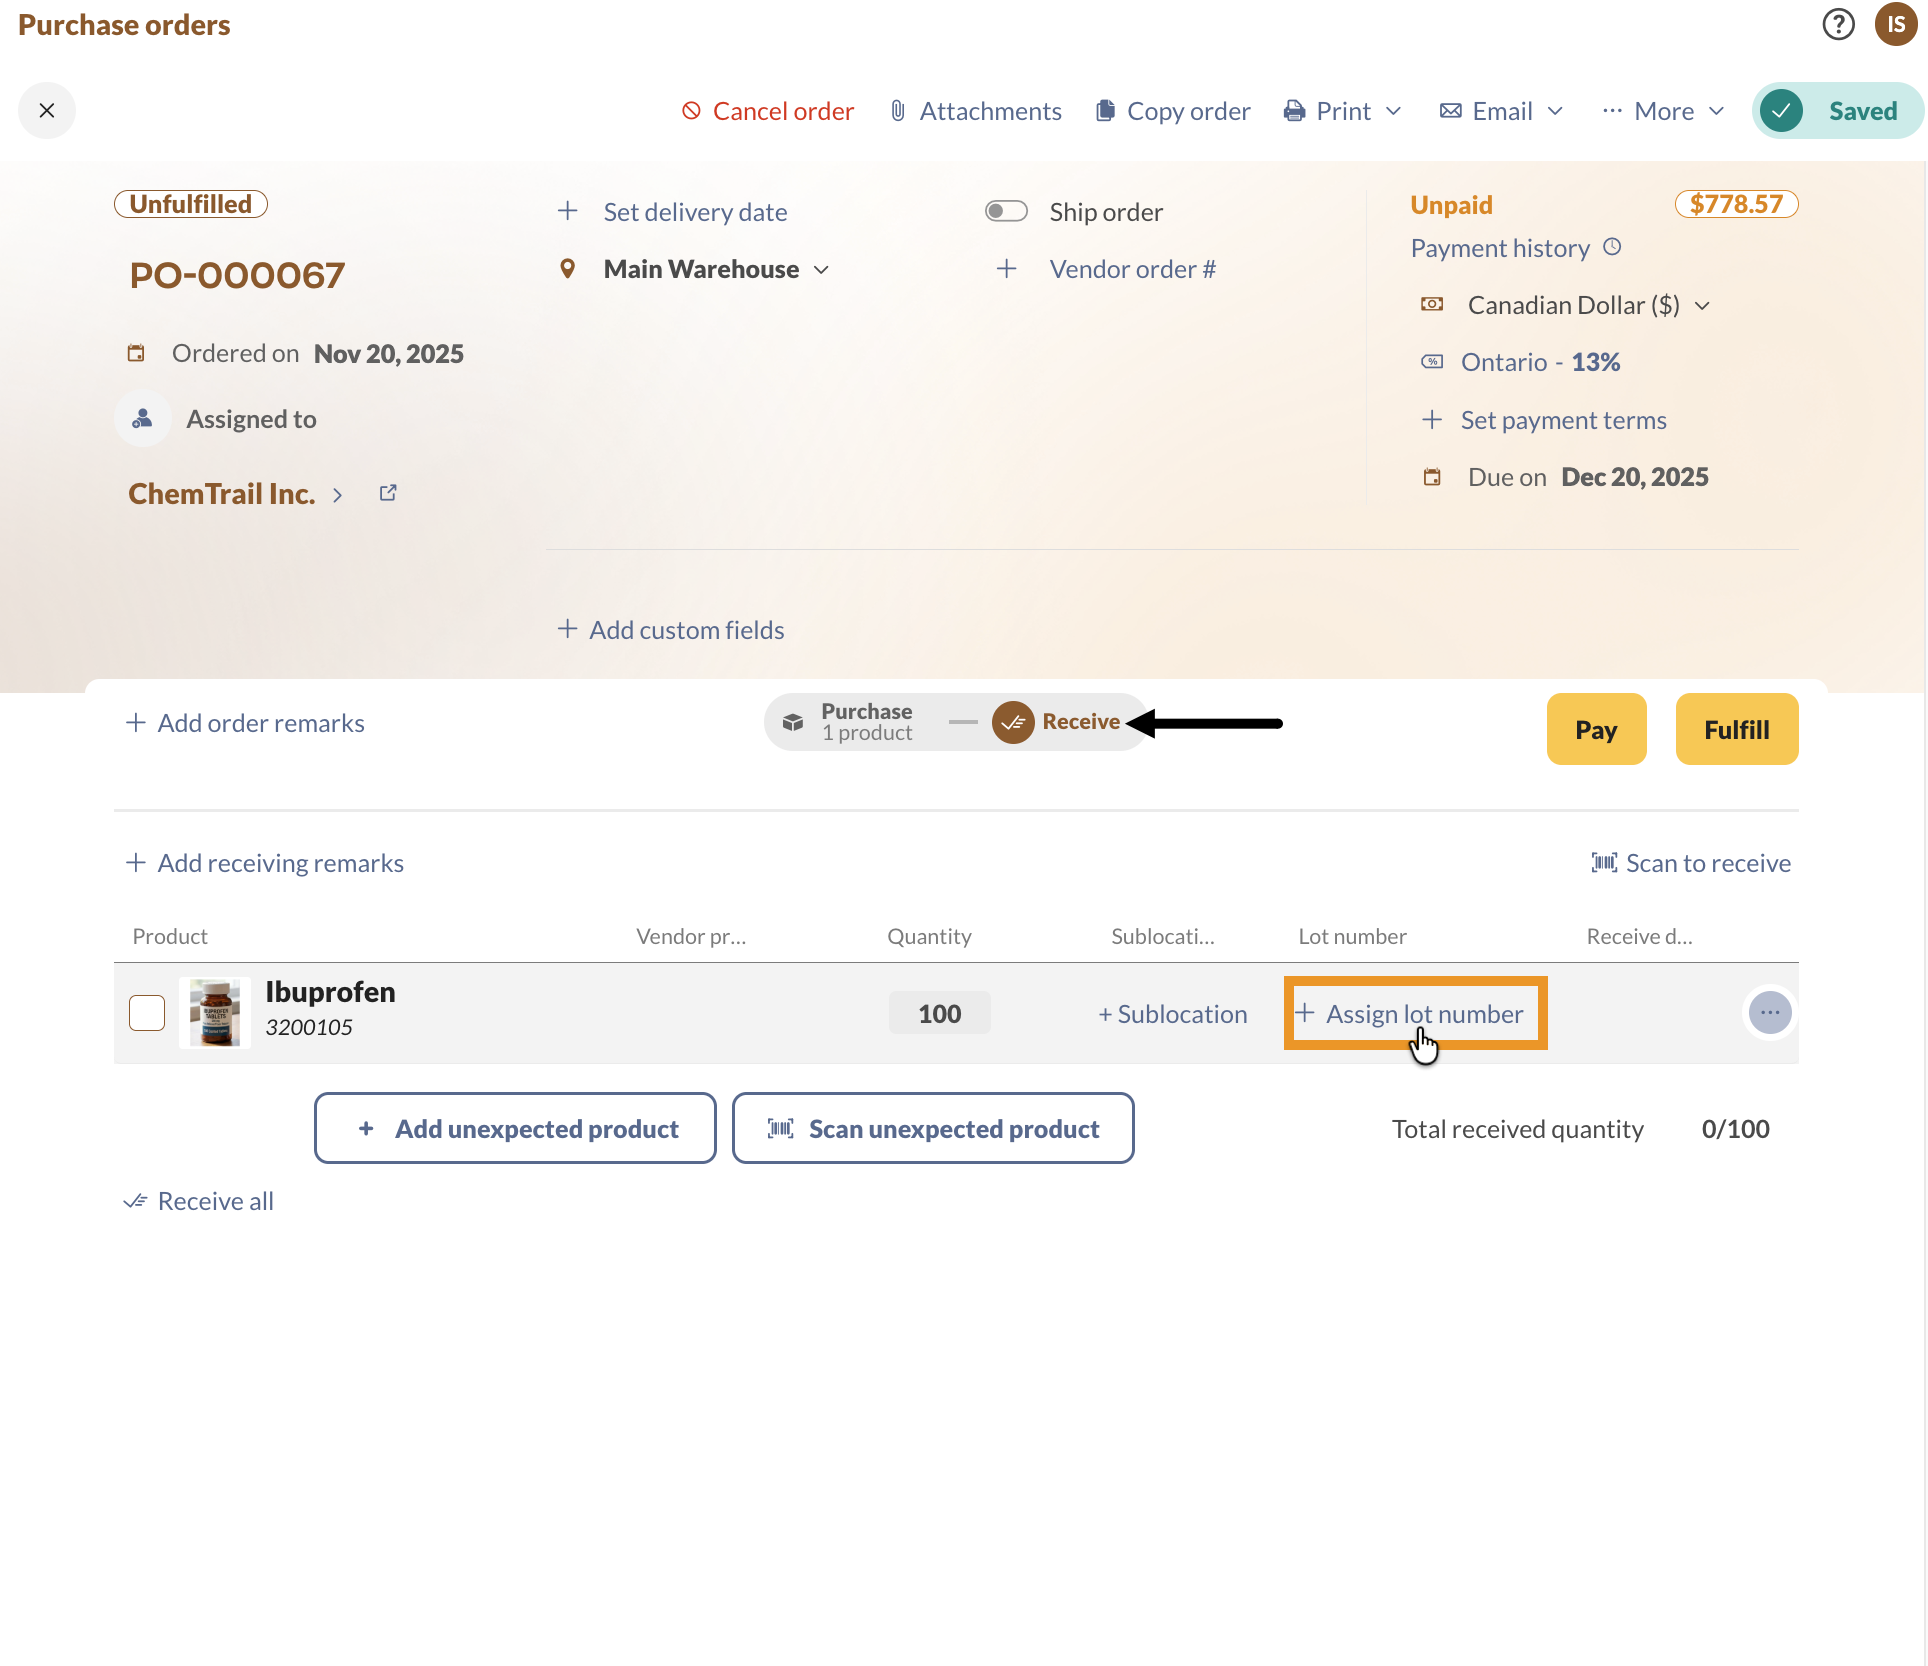
- Open a purchase order, then click the Receive tab.
- Select the product, or click Assign lot number.
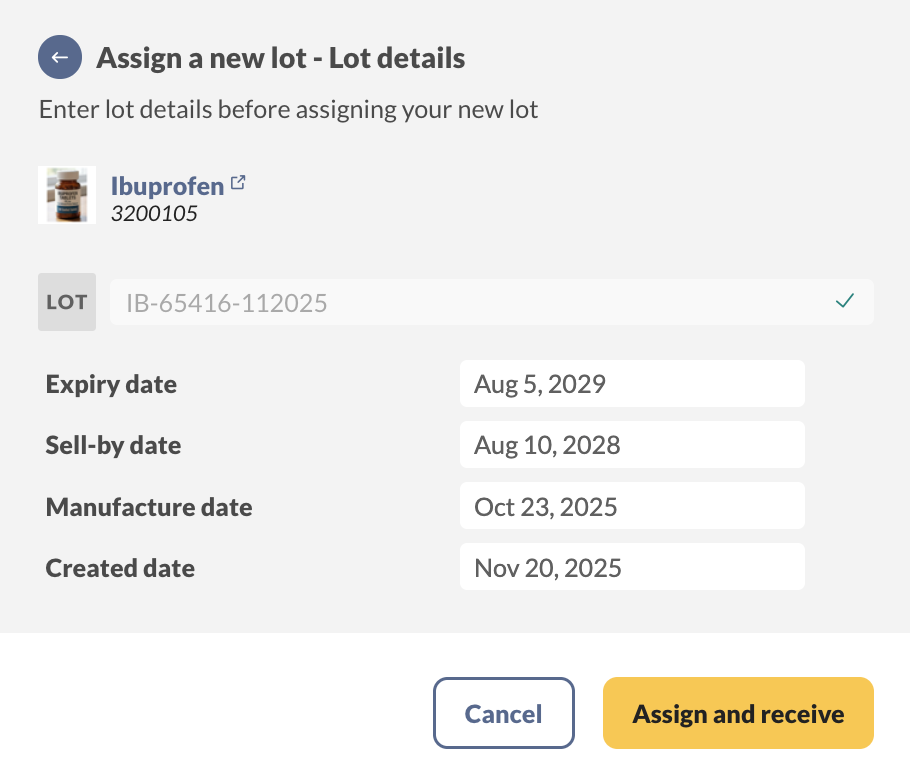
- Type the lot number in the LOT field, or click the barcode icon at the right of the field to scan it. You can also select Auto-generate to have inFlow create one for you. Then click Continue.
- Fill out the fields on the Lot details screen, including the expiry date, sell-by date, manufacture date, and created date. Then click Assign and receive.
- Save the purchase order when done.
Receiving multiple lot numbers for the same product on a PO
If a shipment contains more than one lot of the same product, you can partially receive the products to record each lot number.
- Click the Receive tab.
- Click the Quantity field, enter the quantity for the first lot, then click Partial receive.
- Enter the lot number, then click Continue.
- Fill out the remaining lot details, then click Assign and receive.
- Repeat these steps for each lot number you need to track.
- Save the purchase order when done.
Selling lot products on sales orders
Pick lot products
- Open a sales order, then click the Pick tab.
- Under the Lot & expiry heading, inFlow suggests the lot closest to expiry at the order’s location, so your oldest stock sells first. If the lots have no expiry dates, inFlow suggests the lot with the earliest manufacture date instead. Select the product to mark it as picked.
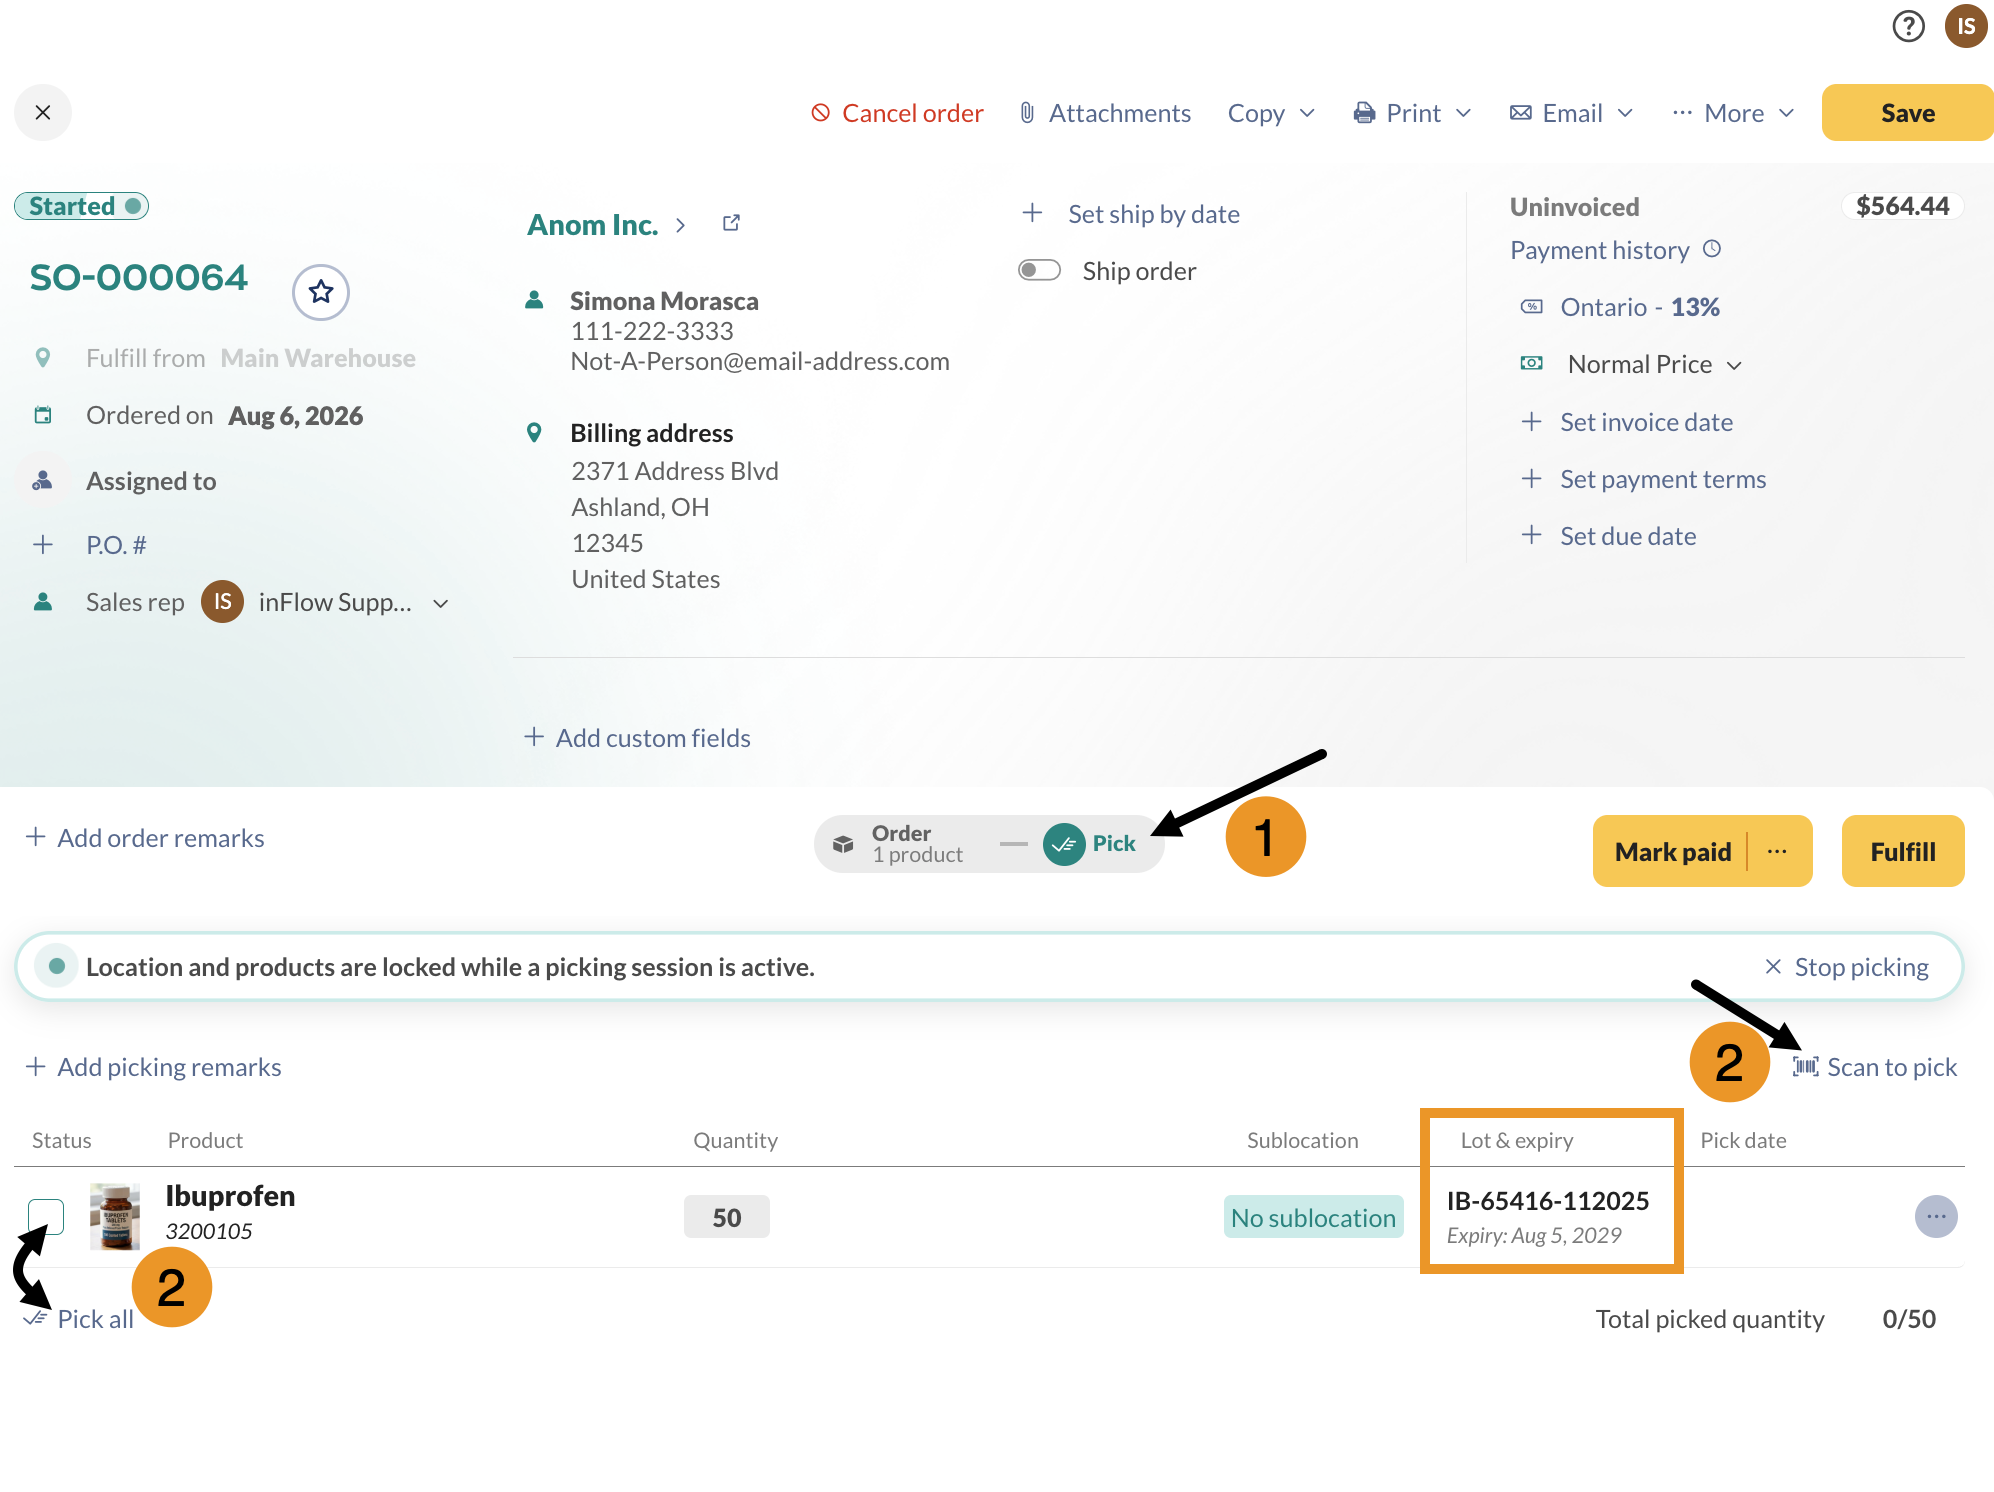
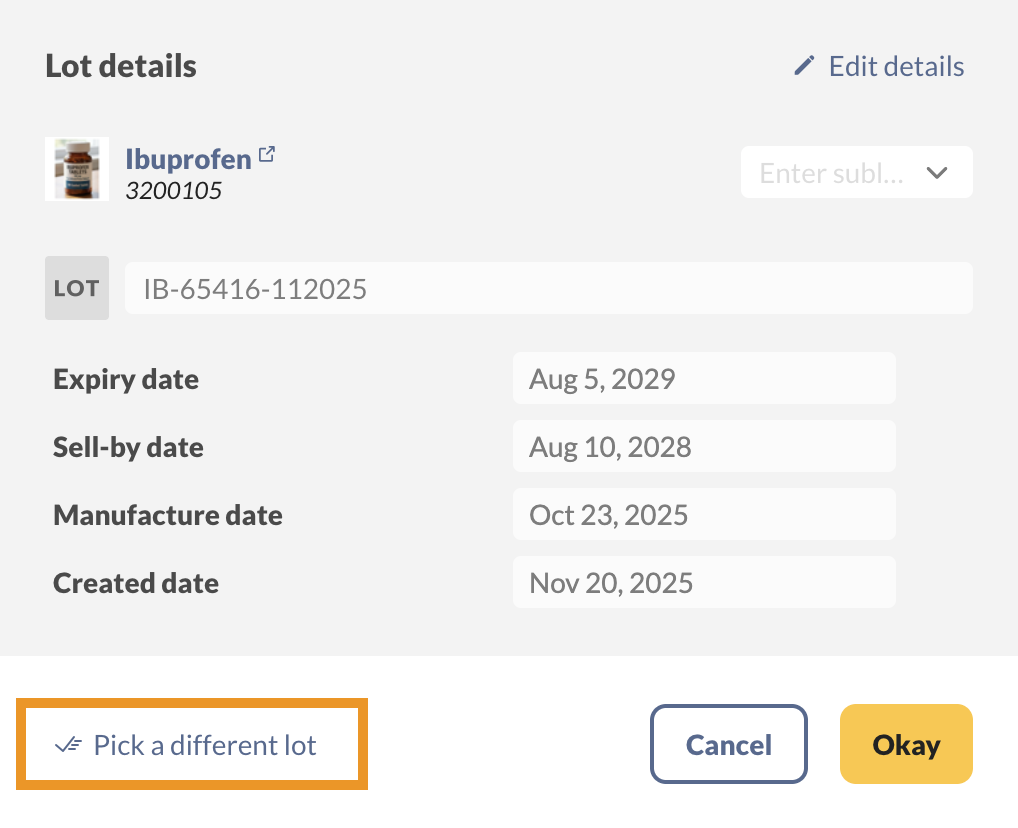
- To pick a different lot, click the lot number, then click Pick a different lot.
- Select a lot number from the list, then click Pick.
- Save the sales order when done.
Want inFlow to pick from the sublocation with the lowest quantity first? You can change how inFlow suggests picks in your picking options.
Returning lot products
- On the sales order, hover over the product, then select Return.
- Click the Restock tab. If you’re adding the product back to your inventory, select Assign a lot number, fill out the lot details, then select Assign and restock. If you’re throwing the product out, click Discard.
- Save the order when done.
How to transfer lot products between locations
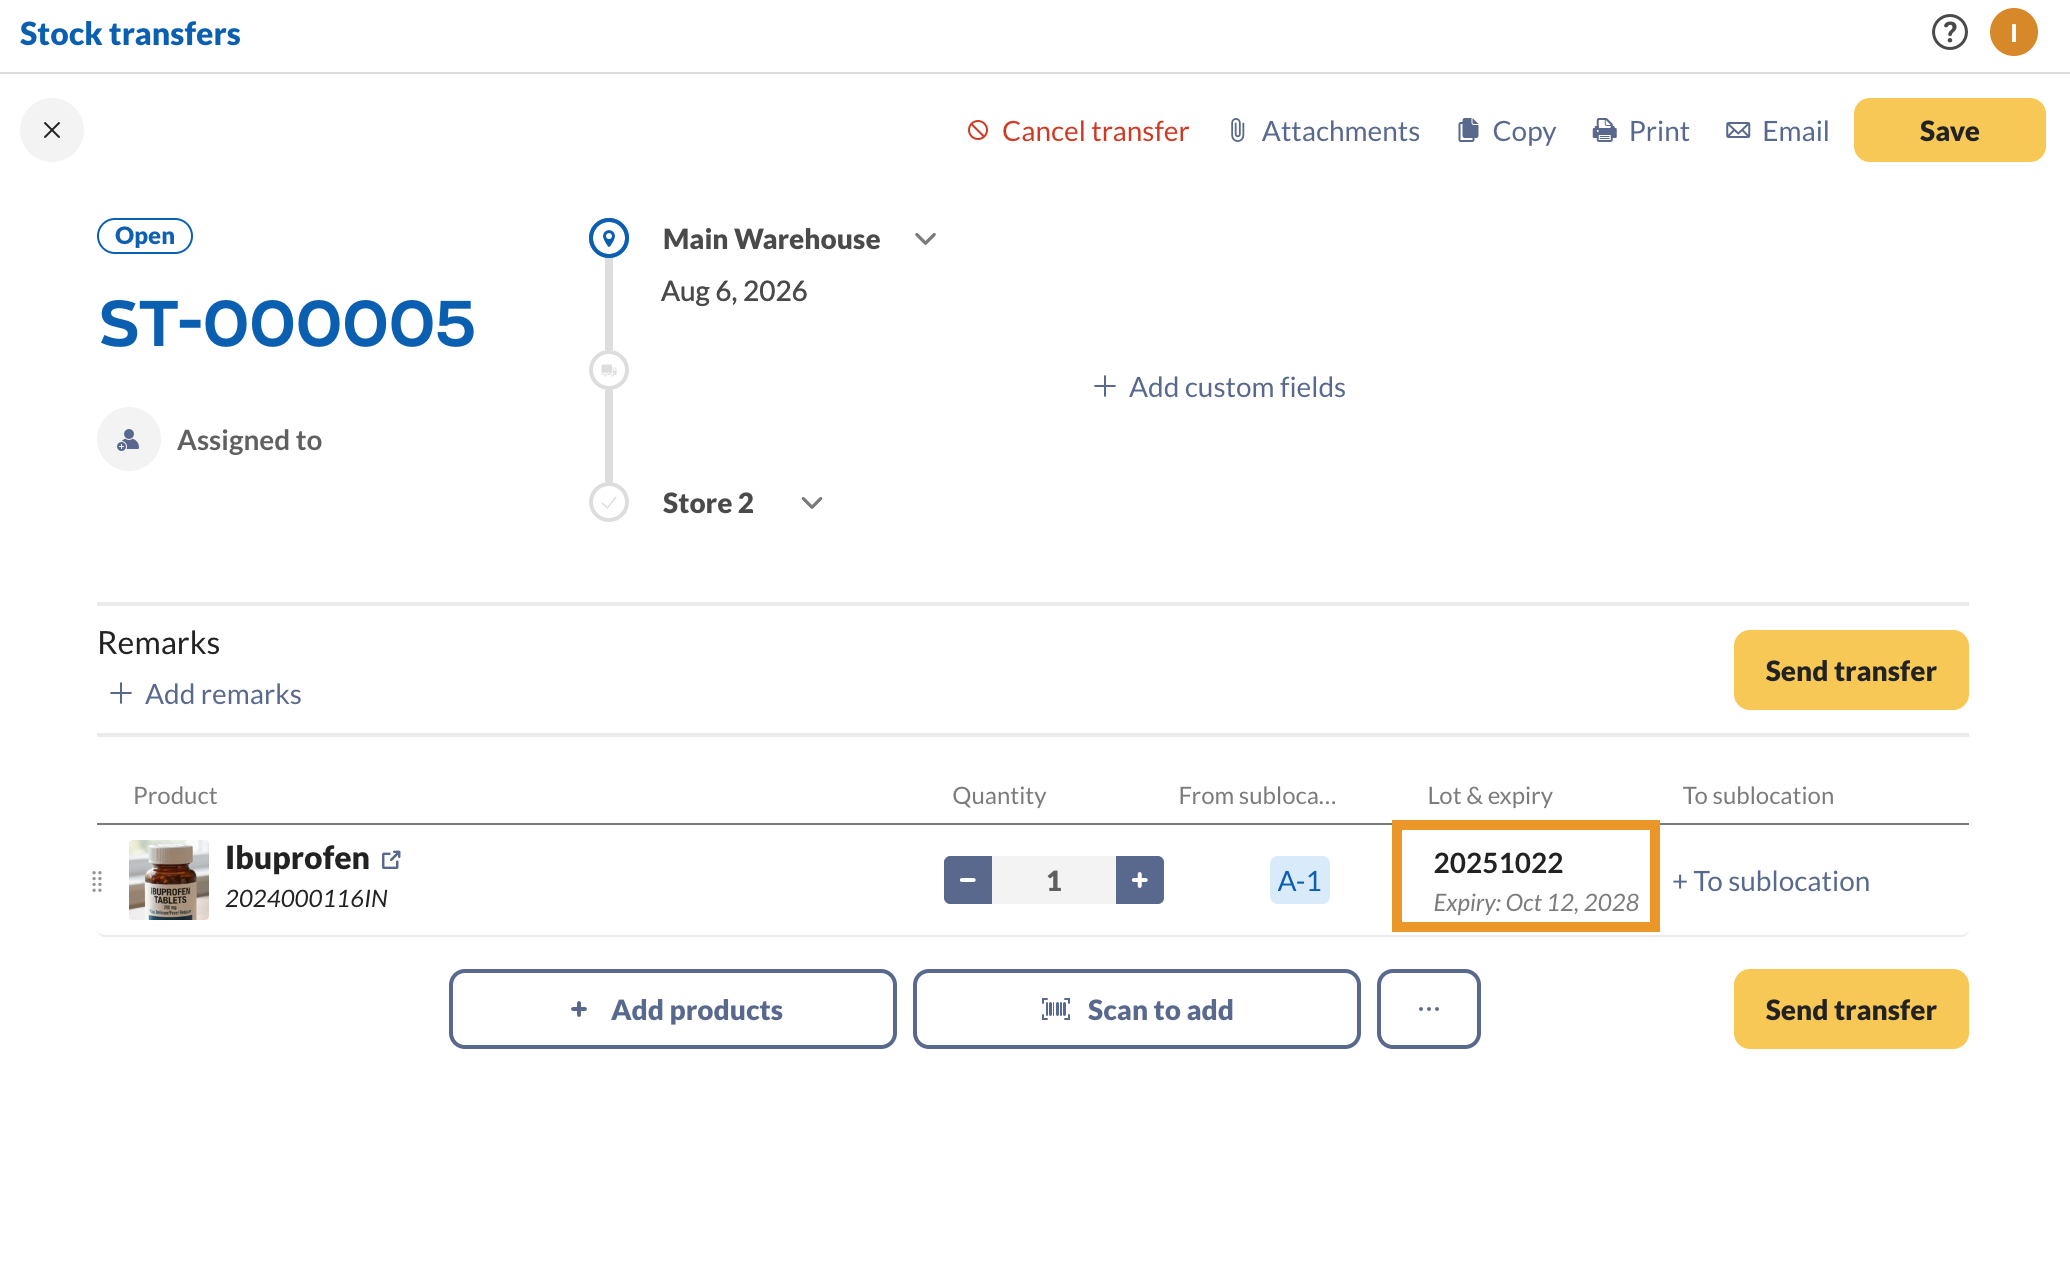
When you move lot-tracked products between locations, you assign the lot number on each line of the stock transfer, so inFlow keeps track of which batch went where.
- From the Main Menu, hover over the Create button
 , then select Transfer.
 - Choose your From location and To location, then add the lot-tracked product.
- On the product line, select the lot number you’re moving.
- Send the transfer to deduct the stock from the From location, then Receive it to add the stock at the To location.
How to count lot products in a stock count
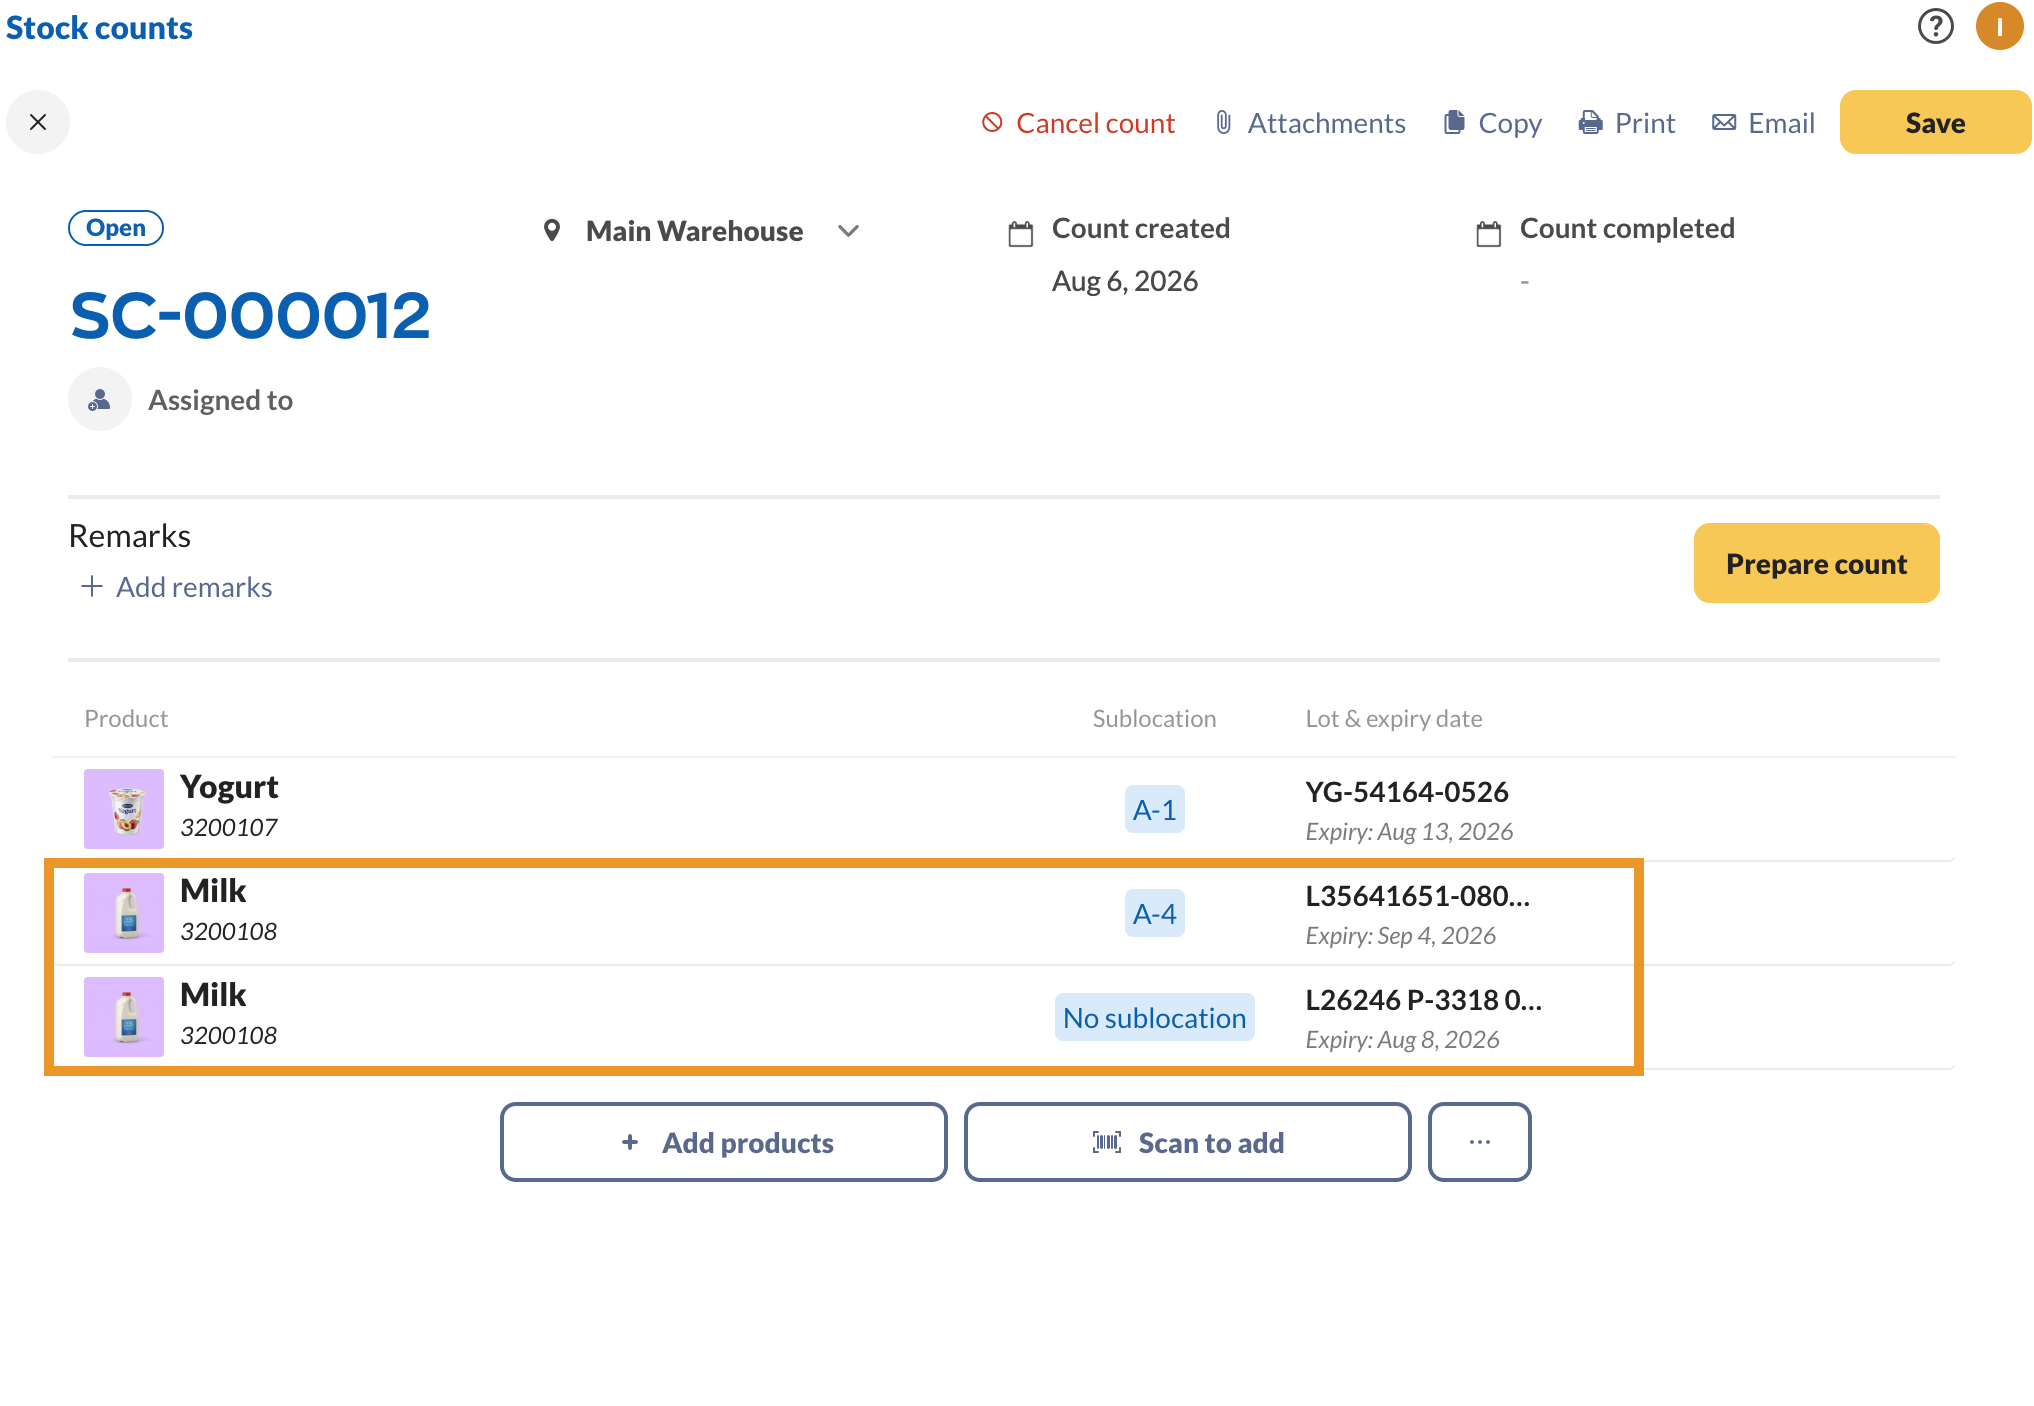
A stock count lets you check your recorded quantities against what’s physically on your shelves. For lot-tracked products, you count each lot separately.
- Create a stock count and choose the location you’re counting.
- Add your lot-tracked products. inFlow lists a separate line for each lot, with its lot number shown in the Lot & expiry column.
- Enter the counted quantity for each lot.
- Review the difference between the snapshot quantity and your counted quantity, then complete the count to update your stock.
How to assign lot numbers when manufacturing products
If you build with lot-tracked products on a manufacture order, inFlow tracks lots on both sides of the build: the components you pick and the finished product you put away.
Picking lot-tracked components
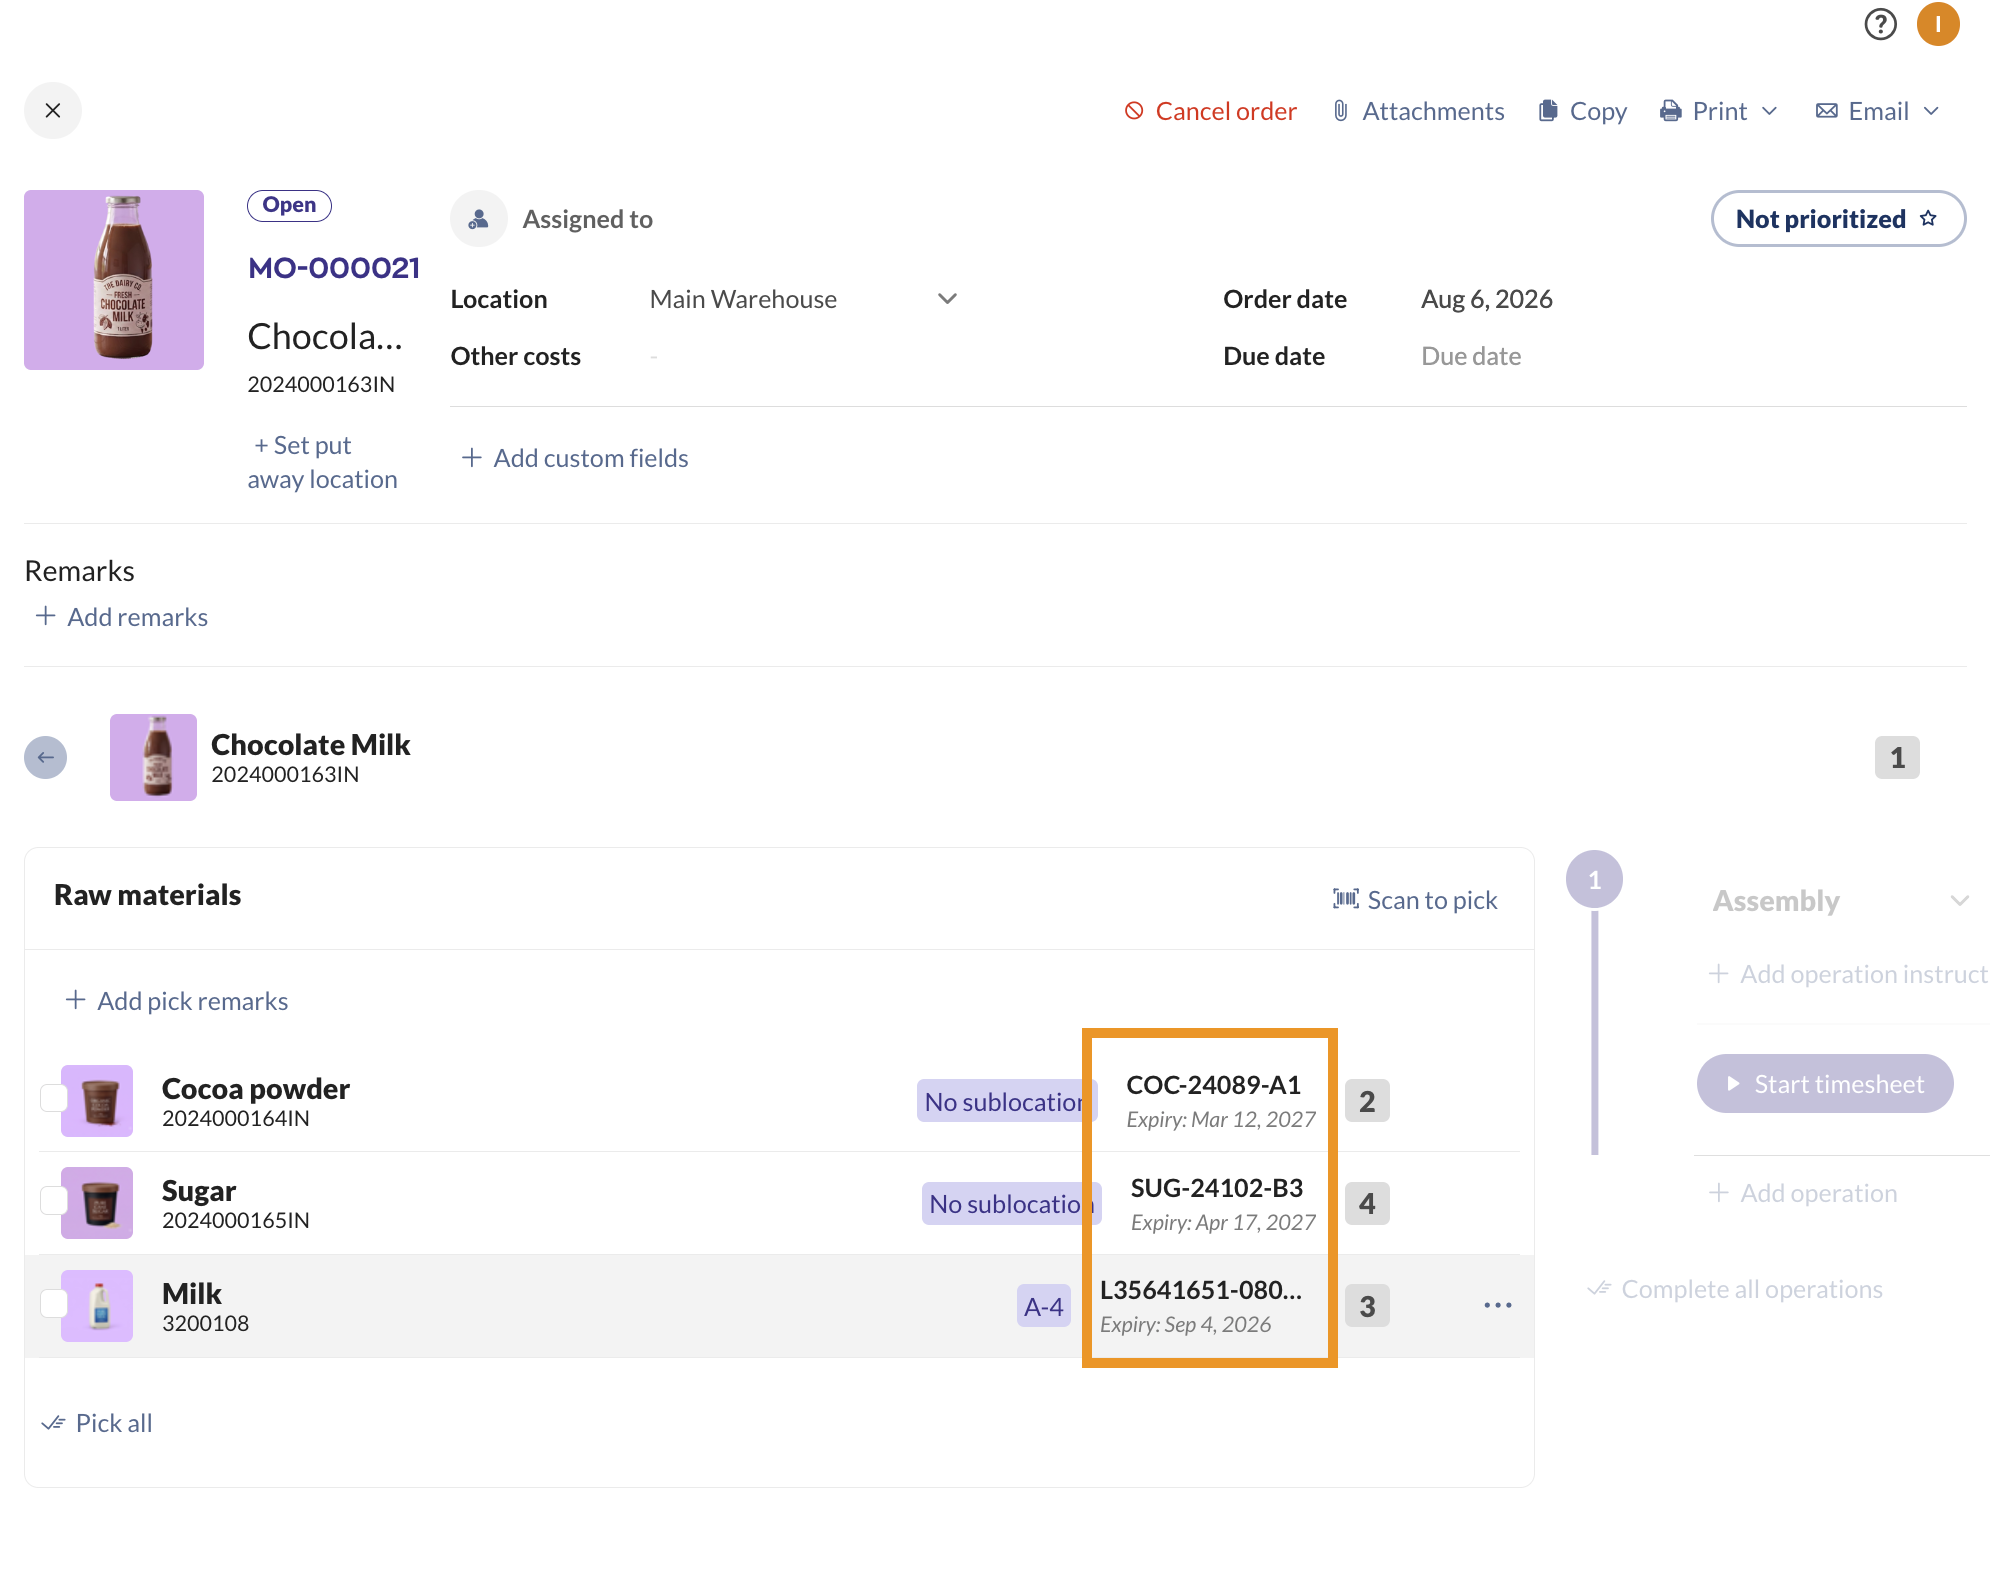
When you pick raw materials that are lot-tracked, each component line shows the lot number and its expiry date, so you know exactly which batch went into the build.
- Open the manufacture order and find the raw materials list.
- inFlow shows the lot number and expiry date on each lot-tracked component line.
- Select the components to pick them, or use Scan to pick to scan them in.
Assign a lot number to the finished product
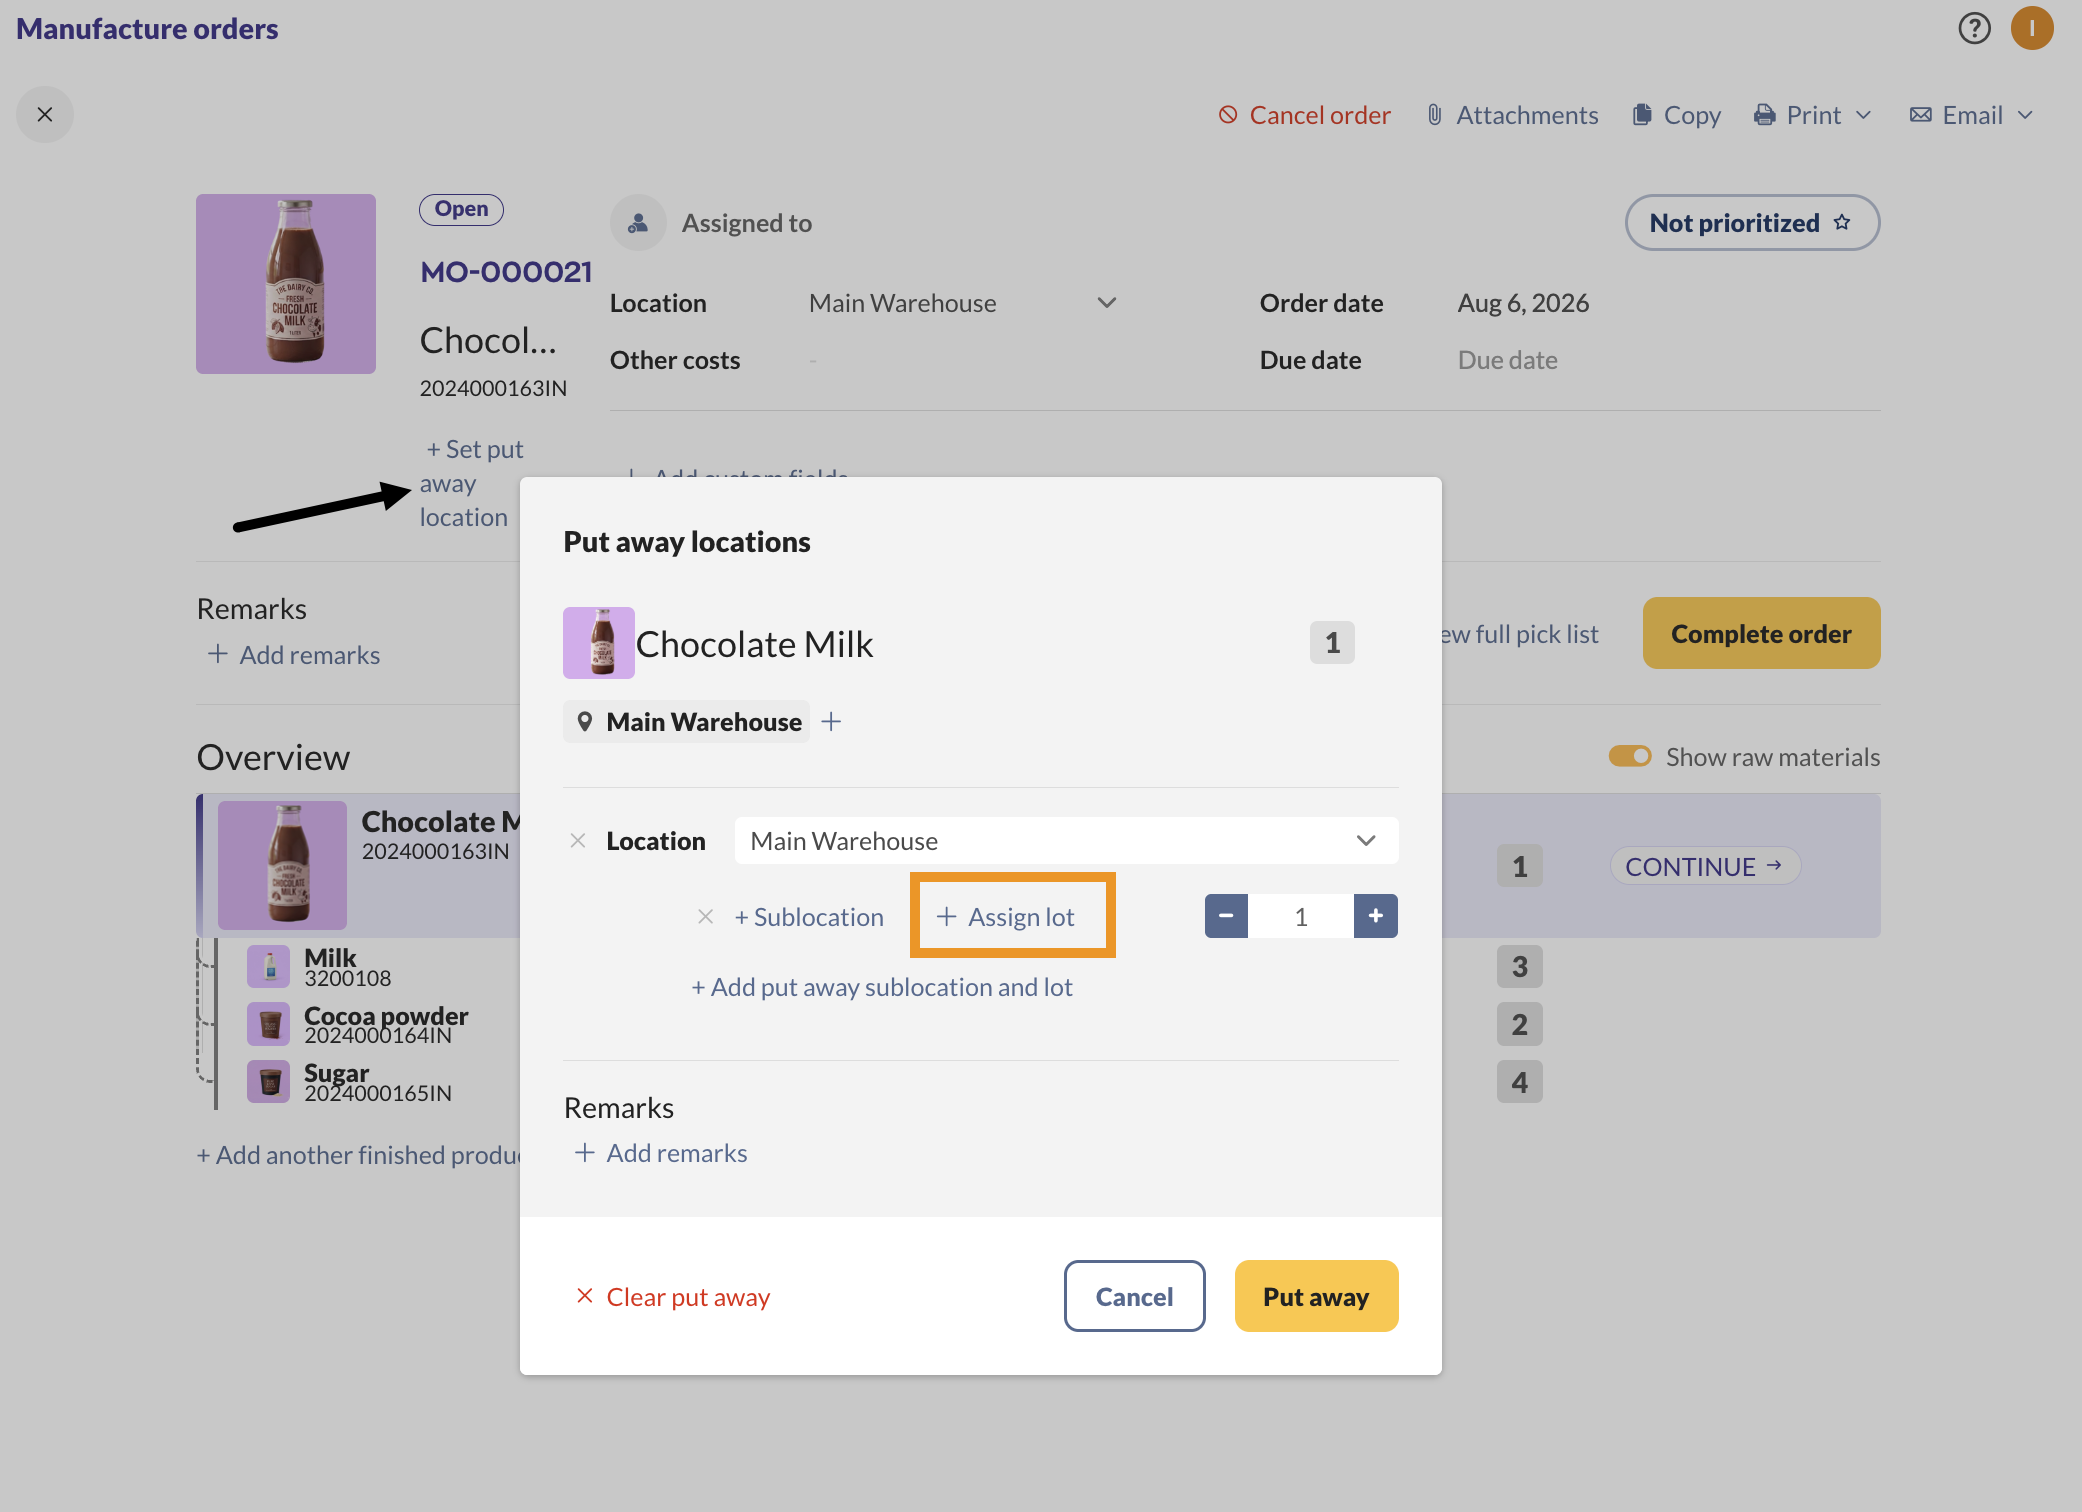
If the finished product is lot-tracked, you assign its lot number when you put the finished goods away.
- Once picking is done, click Set put away location to open the Put away locations window.
- On the finished product’s line, click Assign lot.
- Pick an existing lot or create a new one, fill out the lot details, then confirm.
- Click Put away, then complete the order. inFlow adds the finished products to stock under the lot you assigned.
How to import lot numbers
You can add lot numbers, expiry dates, and lot custom fields in bulk with a product details and stock levels import. This is handy when you’re setting up inFlow for the first time or receiving a large shipment.
For steps, see how to import lot-tracked products to inFlow.
Lot tracking reports
inFlow includes reports that help you keep an eye on your lots and trace them as needed. Hover over the Report  icon in the Main Menu, then select a report category.
| Lot expiry report | This report shows your lots and their expiry dates in one place, so you can spot what’s expired, past its sell-by date, or coming up soon. This is the same report the inFlow lots expiring stock update email links to. |
| Sales traceability report | This report shows which lot numbers went to which customers and on which sales orders. This is the report to reach for during a recall, since it tells you exactly who received a specific batch so you can notify the right customers quickly. |
| Inventory movement summary | This shows how stock has moved over time. You can filter these reports by lot number to trace a batch. |
For the full list of reports and how to run them, see what reports are included in inFlow.
Working with GS1 barcodes
GS1 barcodes and QR codes can carry a product’s lot number, expiry date, and more in a single code, which makes them a great fit for lot-tracked products. inFlow works with GS1 barcodes in two ways:
- Scanning: inFlow for Web and inFlow for Mobile can read GS1 Digital Link QR codes, so one scan fills in the lot details for you.
- Creating labels: inFlow can generate GS1-compliant QR codes, so you can print your own labels that include the lot number, expiry date, and more.
For the full steps, see the How to scan GS1 barcodes in inFlow guide.
 Yes, thanks!
  Not really


0 Comments