How to set up/manage locations in inFlow
In inFlow, you can organize your inventory by tracking products in various locations.
Each location should represent a physical building, and each sublocation should represent shelves, aisles, or bins within that building.
Please note this is only available on select plans or add-ons.
Web
Check out the “Setting up the Basics” video below for step-by-step instructions on adding locations in inFlow. The video covers creating locations at the 2:16 minute mark.
Setting up locations
Setting up your locations properly will allow you to use the Reorder Stock feature and be notified when products need to be reordered. See below to learn more.
- Go to the Inventory settings. (Main Menu>Settings
 >Inventory)
 - Select Locations.
- Click on the arrow next to Default location to rename this to the name of your main location. Remember, this should be named after a building, not a room within a building, for the reordering feature to work correctly!
- If you want to add an address to the location, click on +Add address.
- Click on the blue arrow to return to the main location screen.
- Click + Add location to enter another main location in inFlow.
- Click the star to the right of a location to set that as the default location for inFlow.
- Click Save when done.
Removing locations
You can deactivate locations you no longer use. Before deactivating a location, you will need to zero out the inventory there or transfer the stock to another location.
- Zero out or transfer all existing stock from the location that will be deactivated so the product no longer appears on the Current Stock screen.
- Go to the Inventory settings. (Main Menu>Settings>Inventory)
- Select Locations.
- Click the “X” next to the location you want to deactivate.
- Click Save.
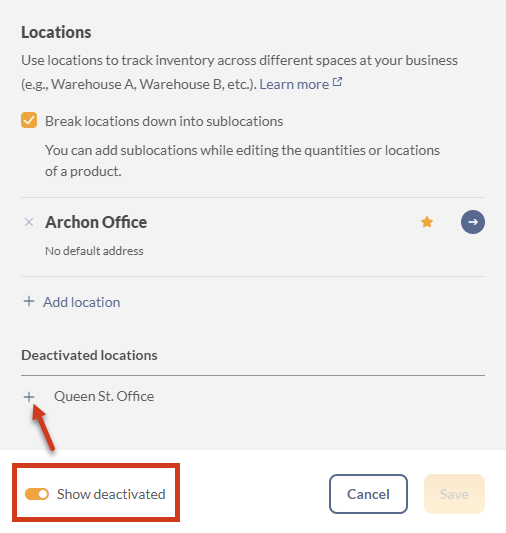
Reactivating locations
- Go to the Inventory settings. (Main Menu>Settings>Inventory.)
- Select Locations.
- Toggle on Show deactivated.
- Click “+” next to the location you want to reactivate.
- Click Save when done.
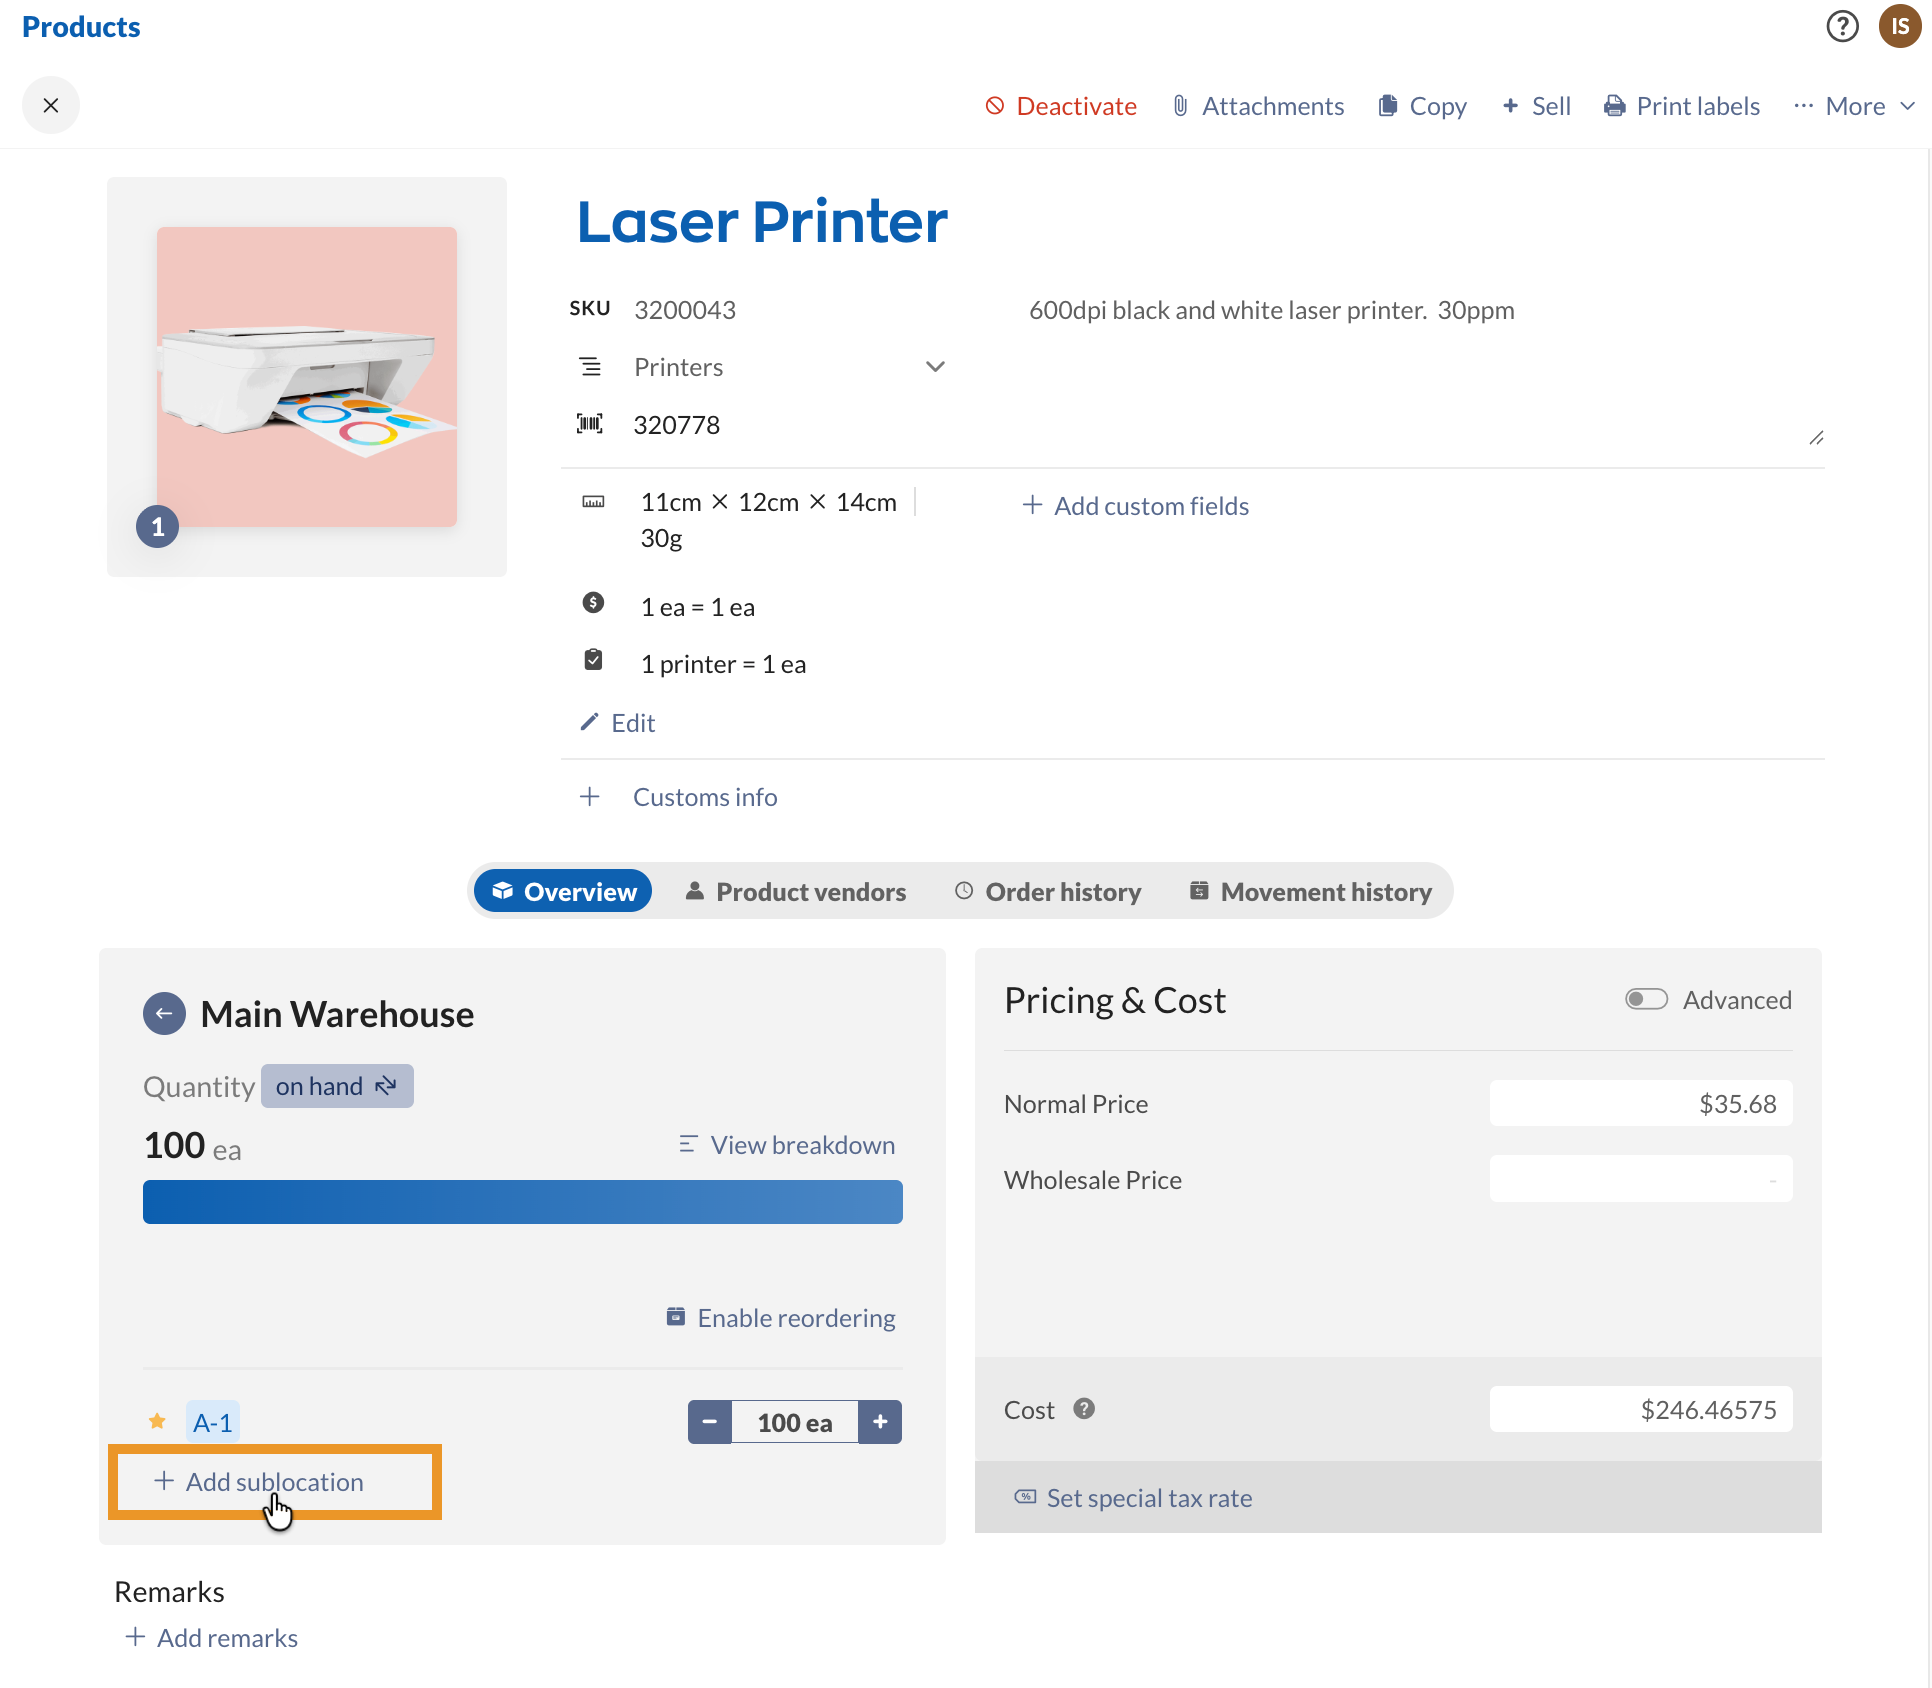
Setting up sublocations
You can add sublocations while editing the quantities or locations on the product record.
- Open a product in inFlow by going to the Main Menu > hover over the Inventory button
 , then select Products.
 - Select a location from the Quantity tile.
- Click Add sublocation and select a sublocation from the list, or New sublocation to create a new one.
- Enter the quantity of the product in the sublocation.
- If there are multiple sublocations, select the star icon to mark one as the default sublocation for that location.
- Save the product record when done.
Sublocations with a quantity of 0 will not appear in the Quantity tile unless they’re the default sublocation.
Understanding the different “default locations” in inFlow

The Location field on purchase, sales, and manufacture orders controls where the products will be received and sold. There are several location defaults you can set to minimize the need to manually select the order location when purchasing, selling, or transferring products.
The Location field on orders is automatically filled based on the following hierarchy:
- The customer’s default location (applicable to sales orders only)
- The personal default location (if the above isn’t set)
- The system default location (if the above isn’t set)
The order Location can also be set manually, which will always override the system, personal, and customer defaults.
System default location
inFlow’s system default location is a global setting, but it can be overridden by other location settings, as you’ll learn below. If you only have the system default location set up, any time an item goes in or out of inventory through a purchase, sales, or work order, it will be received or picked from the system default location.
- Go to the Inventory settings. (Main Menu>Options>Inventory.)
- Select Locations.
- Click the star next to the desired location to set it as the default.
- Click Save.
Personal default location
Each team member can set a personal default location, which overrides the System’s default location when fulfilling orders.
This is helpful if different team members receive and pick from specific locations. We recommend that each team member set their personal default location to avoid always having to change the Order Location on a new order.
The personal default location is set by the team member.
- Click your name in the top right corner, then select Personal.
- Click on Personal defaults.
- Select the location that should default to your inFlow profile from the drop-down menu.
- Click Save when done.
Customer default location
If a customer has a default location set up, inFlow will automatically pick products from that location when you create a sales order for that customer.
- Go to Main Menu > Sales > Customer List.
- Click the customer you want to set as the default location.
- Under Preferences, set the default location in the Location drop-down.
- Click the Save button at the top right of the screen.
Mobile job site locations video
Check out the video below to learn how truck-based locations have become “warehouses on wheels.”
Windows
Setting up your locations properly will allow you to use the Reorder Stock feature and be notified when products need to be reordered. See below to learn more.
Setting up locations
- Open the Settings window (Main Menu > Options > Settings).
- Under “Track inventory by,” click Manage Inventory Locations.
- Add your locations to the table.
- Click the star to the left of a location to set it as the default location.
- Click Save & Close.
Removing locations
You can deactivate locations you no longer use. Before deactivating a location, you will need to zero out the inventory there or transfer the stock to another location.
- Zero out or transfer all existing stock from the location that will be deactivated so the product no longer appears on the Current Stock screen.*
- Open the Settings window (Main Menu > Options > Settings).
- Under “Track inventory by,” click Manage Inventory Locations.
- Select the location you wish to remove and then press “-” below the table.
- Click Save & Close.
Reactivating locations
- Open the Settings window (Main Menu > Options > Settings).
- Under “Track inventory by,” click Manage Inventory Locations.
- Check the Show Inactive box below the table.
- Check the box in the Active column next to the location you want to reactivate.
- Click Save & Close.
Setting up sublocations
- Open the Settings window (Main Menu > Options > Settings).
- Under “Track inventory by,” select Locations broken down into sublocations, then click Manage Inventory Locations.
- Click Edit sublocations.
- Select the location you want to add sublocations to from the drop-down, then enter your sublocations into the table.
- Click Save & Close.
Remove a sublocation:
Before removing a sublocation, you will need to zero out the inventory in that sublocation or transfer the stock to a different sublocation.
- Zero out or transfer all existing stock out of the sublocation you will be removing.
- Open the Settings window (Main Menu > Options > Settings).
- Under “Track inventory by,” select Locations broken down into sublocations, then click Manage Inventory Locations.
- Click Edit sublocations.
- Select the location from which you want to remove sublocations in the drop-down.
- Right-click on the sublocation you wish to remove and select. Delete Selected Rows.
- Click Save & Close.
Understanding the different “default locations” in inFlow
The Location field on purchase, sales, and manufacture orders controls where the products will be received and sold. There are several location defaults you can set to minimize the need to manually select the order location when purchasing, selling, or transferring products.
The Location field on orders is automatically filled based on the following hierarchy:
- The customer’s default location (applicable to sales orders only)
- The personal default location (if the above isn’t set)
- The system’s default location (if the above isn’t set)
The order Location can also be set manually, which will always override the system, personal, and customer defaults.
System default location
inFlow’s system default location is a global setting, but it can be overridden by other location settings, as you’ll learn below. If you only have the system default location set up, any time an item goes in or out of inventory through a purchase, sales, or manufacture order, it will be received or picked from the system default location.
- Open the Settings window (Main Menu > Options > Settings).
- Under “Track inventory by,” click Manage Inventory Locations.
- Click the star to the left of a location to set it as the default location.
- Click Save & Close.
Personal default location
Each team member can set a personal default location, which overrides the System’s default location when fulfilling orders.
This is helpful if different team members receive and pick from specific locations. We recommend that each team member set their personal default location to avoid always having to change the Order Location on a new order.
The personal default location is set by the team member.
- Go to Main Menu > Options > Personal Settings.
- Under Preferences, select a location from the drop-down next to Default Location.
- Click Save & Close.
Customer default location
If a customer has a default location set up, inFlow will automatically pick products from that location when you create a sales order for that customer.
- Go to Main Menu > Sales > Customer List.
- Double-click the customer you want to set as the default location.
- Click the Extra Info tab at the bottom.
- Set the Default Location at the top.
Mobile locations explainer video
Check out the video below to learn how truck-based locations have become “warehouses on wheels.”


0 Comments