 Fellow Canadians: All inFlow plans are available in Canadian dollars




 Home
Home


How to manage customer repairs and warranty replacements
If a customer returns a product for repair or replacement — whether it’s under warranty or not — you can use a sales order to track the entire process. That means you’ll have one clear record of when the product was sold, when it came back, any repair fees you charged, and when the repaired or replacement product was sent back to the customer.

Just need to track your own stock while it’s out for repair? See How to track products out for repair instead. This article covers a customer’s product coming back for repair or a warranty replacement.
The workflow at a glance
Here’s the whole path, from the original sales order to a fulfilled repair. There are two points where you’ll pick the option that fits your situation.
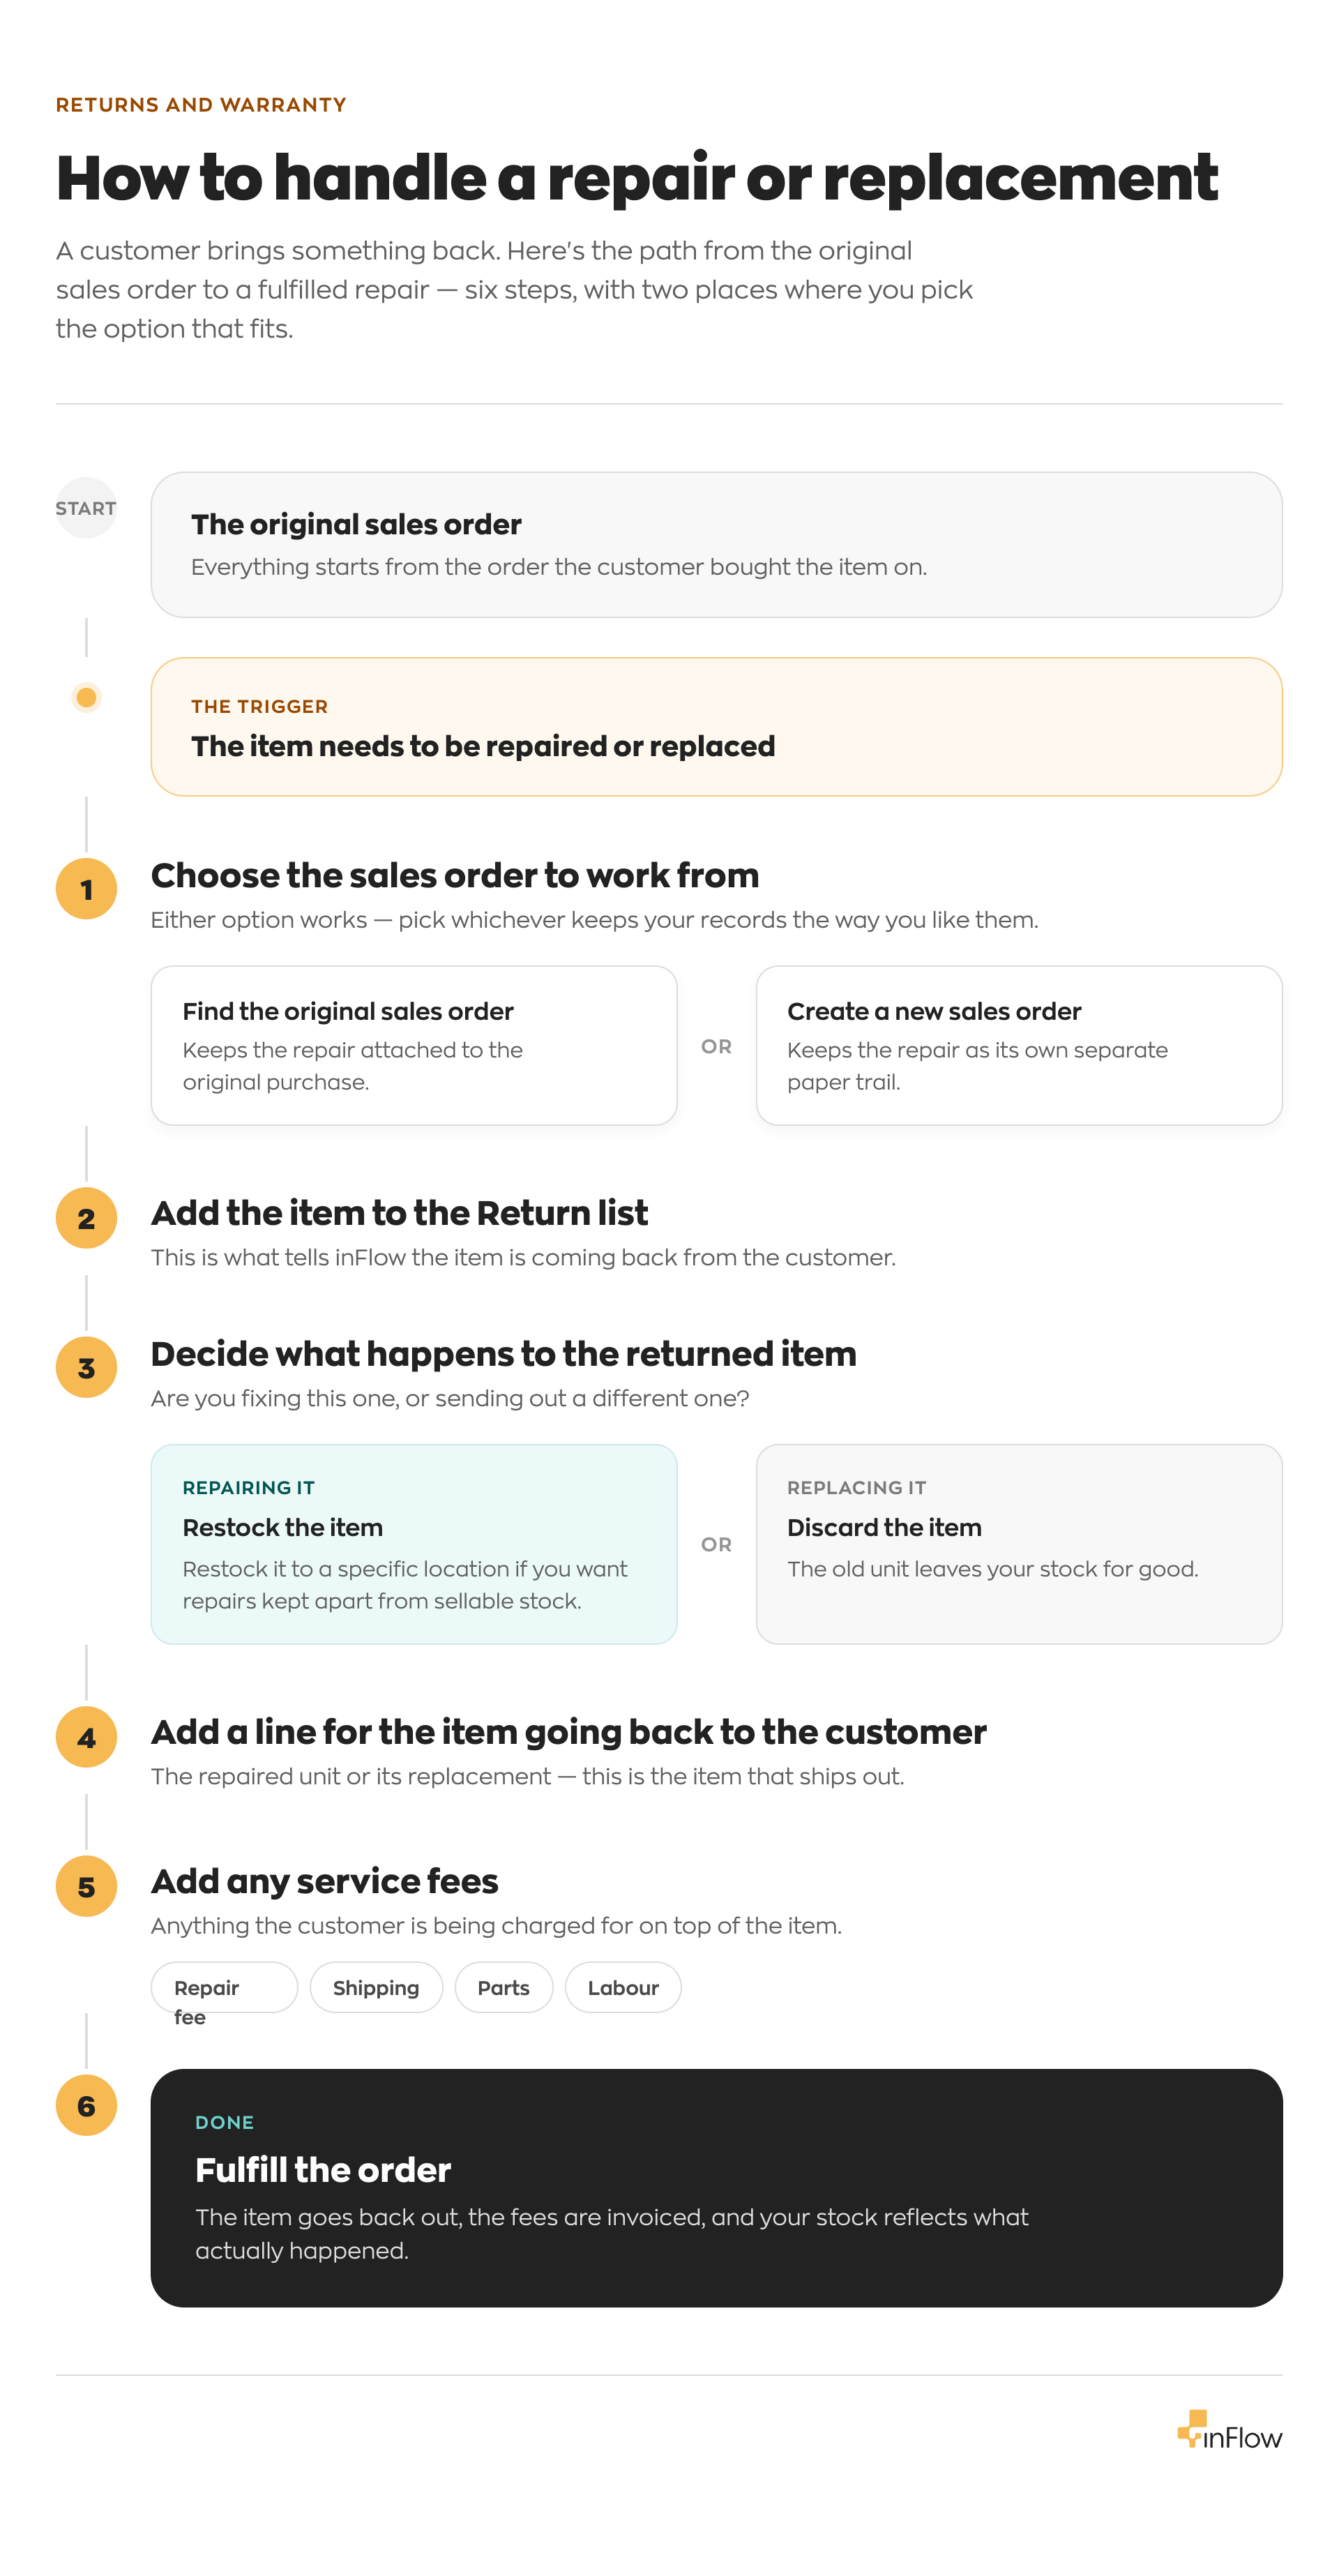
If you use Return Authorization Numbers (RMAs), you can record the RMA in the sales order’s remarks or in a custom field so the return is easy to find later.
Before you start
- Your original sales order must be marked as paid before you can process a return on it.
- If your products are serialized, you’ll be prompted to choose the exact serial number at a few points below. If your products aren’t serialized, you can skip those serial steps.
Step 1: Find or create the sales order
You can either reopen the original sales order or start a brand-new one — both work. Reopening the original keeps everything in one place.
- To reopen the original order, open the customer’s profile and find the order under their order history. You can also search by serial number if you don’t remember the customer.
- If there’s no original order to work from, create a new sales order for the customer instead.
Step 2: Return the product into your system
The goal here is to get the product back into inFlow so you can repair it — not to issue a refund to the customer. There are two ways to start a return:
- On the product’s line, click the Return button (the curved-arrow icon next to the line). This returns that specific product right away.
- Or, at the bottom of the order, click Return products, then click the Return products button, and add the product to be returned.
Once the product is on the return, finish setting it up:
- inFlow will automatically fill in the original price.
- Since you’re not issuing a refund, change the return price to 0. This brings the balance back to zero so no refund is processed.
- Save the order.
If you do need to refund the customer, you can leave the price as is and process the refund here instead.
Step 3: Restock the returned product
- Click the Restock tab.
- If the product is serialized, select the returned product’s serial number first, then save.
- Click Restock to add the product back into your inventory.
- If the product can’t be repaired and needs to be replaced, click Discard on this tab instead of restocking.
Optional: keep repaired products separate
If you want to distinguish repaired products from your regular stock, restock them in a separate location or sub-location — for example, a “Repair shop” sub-location. You can create this location right from the restock screen.
Later, when the repair is done, you can use a stock transfer to move the product from your repair location back into your regular inventory.
Step 4: Add a repair or service fee
If you’re charging for the repair, add it as a line item on the same order.
- Add your repair fee as a line item. Setting the fee up as a service product is handy, because services don’t track quantity — you just pull in the price.
- Add any details you want to record, such as the product name and serial number of the item being repaired.
- Charge the customer now or later, depending on your process.
If the repair is fully covered under warranty and there’s no charge, you can skip this step.
Step 5: Record repair details (optional but recommended)
inFlow automatically tracks the pick date when the product goes out and the restock date when it comes back. To make the record even clearer, you can add extra details:
- Add remarks noting when the repair happened, so it’s distinct from the original sale date.
- Use a custom field for a return date (a date-type field works well), and pull that onto a printed sales order or invoice for the customer.
Step 6: Send the repaired product back to the customer
Once the product is fixed and back in your inventory, add the line for it going back out. You can do this on the same sales order to keep everything together, or create a separate new order that references the original.
- Add the repaired (or replacement) product as a line item.
- Since you’ve already charged the repair fee, set this line’s price to 0 so there’s no extra charge.
- If the product is serialized, select the correct serial number.
- Go to your pick list, confirm the serial number, and fulfill the order.
Cross-reference the two orders
If you use a separate order for the product going back out, add a reference so you can connect the two later. You can do this in the remarks or in a custom field — for example, a “Repair SO number” field that points back to the original sales order number. Then you can search by that reference and pull both orders up together.
The result
You now have a complete record:
- when the product was originally sold,
- when it came back for repair,
- the fees charged for that repair,
- and when the repaired product went back out at no cost.
Everything stays searchable and connected to the customer, so you can pull up the full history whenever you need it.
 Yes, thanks!
  Not really

0 Comments